Your First Screen
Let’s create a simple screen that displays a greeting and the current time. This will introduce you to the basic workflow of creating Byonk screens.
Step 0: Set Up Your Workspace
Byonk embeds all assets in the binary. To customize screens, you must set environment variables pointing to external directories.
For binary users:
# Set paths and start server (auto-seeds empty directories)
export SCREENS_DIR=./screens
export CONFIG_FILE=./config.yaml
byonk serve
For Docker users:
docker run -d --pull always -p 3000:3000 \
  -e SCREENS_DIR=/data/screens \
  -e CONFIG_FILE=/data/config.yaml \
  -v ./data:/data \
  ghcr.io/oetiker/byonk
On first run, empty directories are automatically populated with defaults. You can then edit the files in screens/ and config.yaml.
Tip: Keep the server running in a terminal. Lua scripts and SVG templates are reloaded on every request - just save and refresh!
Step 1: Create the Lua Script
Create a new file screens/hello.lua:
-- Hello World screen
-- Displays a greeting with the current time

local now = time_now()

return {
  data = {
    greeting = "Hello, World!",
    time = time_format(now, "%H:%M:%S"),
    date = time_format(now, "%A, %B %d, %Y")
  },
  refresh_rate = 60  -- Refresh every minute
}
What this does:
time_now()gets the current Unix timestamptime_format()formats it into readable strings- The returned
datatable is passed to the template refresh_ratetells the device to check back in 60 seconds
Step 2: Create the SVG Template
Create a new file screens/hello.svg:
<svg xmlns="http://www.w3.org/2000/svg" viewBox="0 0 800 480" width="800" height="480">
  <style>
    .greeting {
      font-family: Outfit, sans-serif;
      font-size: 48px;
      font-weight: 700;
      fill: black;
    }
    .time {
      font-family: Outfit, sans-serif;
      font-size: 72px;
      font-weight: 700;
      fill: black;
    }
    .date {
      font-family: Outfit, sans-serif;
      font-size: 24px;
      font-weight: 400;
      fill: #555;
    }
    .footer {
      font-family: Outfit, sans-serif;
      font-size: 14px;
      font-weight: 400;
      fill: #999;
    }
  </style>

  <!-- White background -->
  <rect width="800" height="480" fill="white"/>

  <!-- Greeting -->
  <text class="greeting" x="400" y="120" text-anchor="middle">
    {{ data.greeting }}
  </text>

  <!-- Large time display -->
  <text class="time" x="400" y="260" text-anchor="middle">
    {{ data.time }}
  </text>

  <!-- Date below -->
  <text class="date" x="400" y="320" text-anchor="middle">
    {{ data.date }}
  </text>

  <!-- Footer -->
  <text class="footer" x="400" y="450" text-anchor="middle">
    My first Byonk screen!
  </text>
</svg>
Template features used:
{{ data.variable }}- Inserts values from the Lua script’sdatatable- CSS styling for fonts and colors
text-anchor="middle"for centered text
Step 3: Add the Screen to Configuration
Edit config.yaml to add your new screen:
screens:
  # ... existing screens ...

  hello:
    script: hello.lua
    template: hello.svg
    default_refresh: 60
Step 4: Assign to a Device
Still in config.yaml, assign the screen to your device:
devices:
  "YOUR:MAC:AD:DR:ES:S0":
    screen: hello
    params: {}
Replace YOUR:MAC:AD:DR:ES:S0 with your device’s actual MAC address.
Tip: Check the Byonk server logs when your device connects - the MAC address is printed there.
Step 5: Test It
-
Restart Byonk (config.yaml changes require restart)
-
Check the API at
http://localhost:3000/swagger-ui:- Use the
/api/displayendpoint with your device’s MAC - You’ll get an image URL with a content hash
- Open that URL to see your screen!
- Use the
-
Or wait for your device to refresh automatically
Adding Parameters
Let’s make the greeting customizable. Update your files:
screens/hello.lua:
local now = time_now()

-- Get name from params, default to "World"
local name = params.name or "World"

return {
  data = {
    greeting = "Hello, " .. name .. "!",
    time = time_format(now, "%H:%M:%S"),
    date = time_format(now, "%A, %B %d, %Y")
  },
  refresh_rate = 60
}
config.yaml:
devices:
  "YOUR:MAC:AD:DR:ES:S0":
    screen: hello
    params:
      name: "Alice"
Now your screen will say “Hello, Alice!” instead of “Hello, World!”.
Adding a QR Code
Let’s add a QR code to the screen that links to documentation. QR codes are useful for providing quick access to related content.
Update screens/hello.lua:
local now = time_now()
local name = params.name or "World"

return {
  data = {
    greeting = "Hello, " .. name .. "!",
    time = time_format(now, "%H:%M:%S"),
    date = time_format(now, "%A, %B %d, %Y"),
    -- Generate a QR code anchored to bottom-right corner with 10px margin
    qr_code = qr_svg("https://www.youtube.com/watch?v=dQw4w9WgXcQ", {
      anchor = "bottom-right",
      right = 10,
      bottom = 10,
      module_size = 4
    })
  },
  refresh_rate = 60
}
Update screens/hello.svg to include the QR code:
<!-- Add before the closing </svg> tag -->

<!-- QR Code - use 'safe' filter to render SVG -->
{{ data.qr_code | safe }}
The qr_svg() function generates pixel-aligned QR codes optimized for e-ink displays. Use anchor to specify which corner, and top/left/right/bottom for margins from that edge:
| Anchor | Margin options |
|---|---|
top-left | top, left |
top-right | top, right |
bottom-left | bottom, left |
bottom-right | bottom, right |
center | (centered on screen) |
All options:
qr_svg("https://example.com", {
  anchor = "bottom-right", -- Which corner (default: "top-left")
  right = 10,              -- Margin from right edge in pixels
  bottom = 10,             -- Margin from bottom edge in pixels
  module_size = 4,         -- QR "pixel" size (default: 4, recommended: 3-6)
  ec_level = "M",          -- Error correction: L/M/Q/H (default: M)
  quiet_zone = 4           -- QR quiet zone in modules (default: 4)
})
Tip: Use the
| safefilter in templates to render SVG content without escaping.
Understanding the Result
Your screen should look like this:

Troubleshooting
Screen shows error
Check the Byonk logs for script errors:
byonk serve
# Look for ERROR or WARN lines
Template variables not replaced
Make sure your Lua script returns a data table with the expected keys:
return {
  data = {
    greeting = "Hello"  -- Must match {{ greeting }} in template
  },
  refresh_rate = 60
}
Device not updating
- Check that the device MAC in config matches exactly (uppercase, with colons)
- Verify the device is pointing to your Byonk server
- Check device WiFi connectivity
Real-World Example: Transit Departures
Here’s what a more complex screen looks like - the built-in transit departure display:
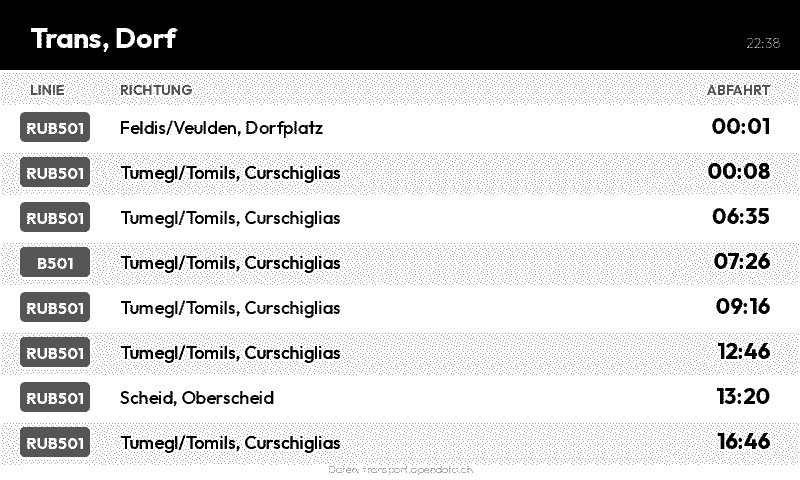
This screen demonstrates:
- Fetching live data from an API
- Processing JSON responses
- Dynamic refresh rates (updates after each bus departs)
- Styled table layout with alternating rows
- Color-coded line badges
Check out screens/transit.lua and screens/transit.svg in the Byonk source for the complete implementation.
What’s Next?
Now that you have a basic screen working, learn more about:
- Lua Scripting - Fetch data from APIs
- SVG Templates - Create complex layouts