Byonk
Bring Your Own Ink - Self-hosted content server for TRMNL e-ink devices
Features
- Lua Scripting - Fetch data from any API, scrape websites, process JSON - all with simple Lua scripts.
- SVG Templates - Design pixel-perfect screens using SVG with Tera templating (Jinja2-style syntax).
- Variable Fonts - Full support for variable font weights via CSS font-variation-settings.
- Smart Refresh - Scripts control when devices refresh - optimize for fresh data and battery life.
- Palette-Aware Dithering - Perceptually correct Oklab dithering with two rendering intents (Graphics and Photo), supporting greyscale and color palettes.
- Device Mapping - Assign different screens to different devices via simple YAML configuration.
Quick Start
# Run with Docker
docker run -d -p 3000:3000 ghcr.io/oetiker/byonk:latest
Or download a pre-built binary for your platform.
Point your TRMNL device to http://your-server:3000 and it will start displaying content.
How It Works
flowchart LR
    A[Lua Script] --> B[SVG Template] --> C[Dithering] --> D[TRMNL PNG]
- Lua scripts fetch data from APIs or scrape websites
- SVG templates render the data into beautiful layouts
- Renderer converts SVG to dithered PNG optimized for e-ink
- Device displays the content and sleeps until next refresh
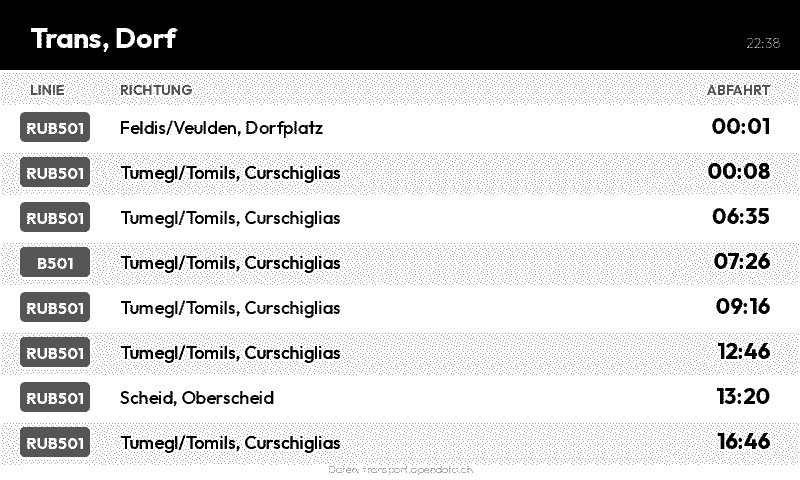
Example: Transit Departures
Lua Script fetches real-time data:
local response = http_get("https://transport.opendata.ch/v1/stationboard?station=Olten")
local data = json_decode(response)

return {
  data = { departures = data.stationboard },
  refresh_rate = 60
}
SVG Template renders the display:
<svg viewBox="0 0 800 480">
  {% for dep in departures %}
  <text y="{{ 100 + loop.index0 * 40 }}">
    {{ dep.category }}{{ dep.number }} → {{ dep.to }}
  </text>
  {% endfor %}
</svg>
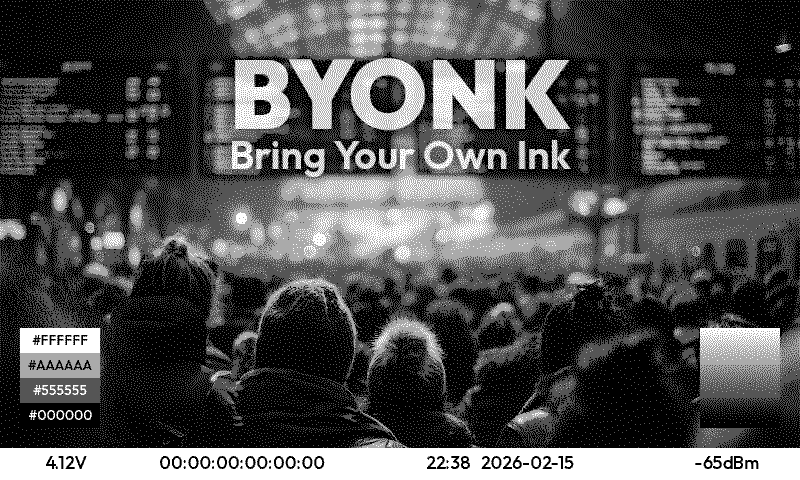
Result on e-ink display:
Next Steps
- Installation Guide - Set up Byonk on your server
- Architecture - Understand how Byonk works
- Create Your First Screen - Build a custom display
- API Reference - HTTP and Lua API documentation
Installation
Byonk can be installed via Docker container or pre-built binaries. All screens, fonts, and configuration are embedded in the binary, so it works out of the box with zero configuration.
Quick Start
# Just run it - embedded assets work immediately
docker run --pull always -p 3000:3000 ghcr.io/oetiker/byonk:latest
That’s it! The server is running with embedded default screens.
Docker (Recommended)
Zero-Config Mode
The simplest way to run Byonk:
docker run -d --pull always \
  --name byonk \
  -p 3000:3000 \
  ghcr.io/oetiker/byonk:latest
This uses embedded screens, fonts, and config - no volumes needed.
Customization Mode
To customize screens and config, mount volumes and set environment variables:
docker run -d --pull always \
  --name byonk \
  -p 3000:3000 \
  -e SCREENS_DIR=/data/screens \
  -e FONTS_DIR=/data/fonts \
  -e CONFIG_FILE=/data/config.yaml \
  -v ./data:/data \
  ghcr.io/oetiker/byonk:latest
On first run with empty directories, Byonk automatically seeds them with embedded defaults.
Available tags:
latest- Latest stable release0- Latest v0.x release0.4- Latest v0.4.x release0.4.0- Specific version
Docker Compose
Zero-config:
services:
  byonk:
    image: ghcr.io/oetiker/byonk:latest
    ports:
      - "3000:3000"
    restart: unless-stopped
With customization:
services:
  byonk:
    image: ghcr.io/oetiker/byonk:latest
    ports:
      - "3000:3000"
    environment:
      - SCREENS_DIR=/data/screens
      - FONTS_DIR=/data/fonts
      - CONFIG_FILE=/data/config.yaml
    volumes:
      - ./data:/data  # Empty on first run = auto-seeded
    restart: unless-stopped
Pre-built Binaries
Download the latest release from GitHub Releases.
Available platforms:
x86_64-unknown-linux-gnu- Linux (Intel/AMD 64-bit)aarch64-unknown-linux-gnu- Linux (ARM 64-bit, e.g., Raspberry Pi 4)x86_64-apple-darwin- macOS (Intel)aarch64-apple-darwin- macOS (Apple Silicon)x86_64-pc-windows-msvc- Windows
Extract and run:
tar -xzf byonk-*.tar.gz
./byonk
This will show you a short usage message. If you want to directly test the server, try
./byonk serve
By default, Byonk listens on 0.0.0.0:3000 and uses embedded assets.
Extracting Embedded Assets
To customize the embedded screens and config:
# See what's embedded
./byonk init --list

# Extract everything for editing
./byonk init --all

# Extract specific categories
./byonk init --screens
./byonk init --config
Directory Structure (When Customizing)
When using external files (via env vars), Byonk expects:
data/
├── config.yaml          # Device and screen configuration
├── screens/             # Lua scripts and SVG templates
│   ├── default.lua
│   ├── default.svg
│   └── ...
└── fonts/               # Custom fonts (optional)
    └── Outfit-Variable.ttf
Environment Variables
| Variable | Default | Description |
|---|---|---|
BIND_ADDR | 0.0.0.0:3000 | Server bind address |
CONFIG_FILE | (embedded) | Path to configuration file |
SCREENS_DIR | (embedded) | Directory containing Lua scripts and SVG templates |
FONTS_DIR | (embedded) | Directory containing font files |
When path variables are not set, Byonk uses embedded assets (no filesystem access).
Running as a Service (systemd)
Create /etc/systemd/system/byonk.service:
[Unit]
Description=Byonk Content Server
After=network.target

[Service]
Type=simple
User=byonk
WorkingDirectory=/opt/byonk
ExecStart=/opt/byonk/byonk serve
Environment="BIND_ADDR=0.0.0.0:3000"
Restart=always
RestartSec=5

[Install]
WantedBy=multi-user.target
Enable and start:
sudo systemctl enable byonk
sudo systemctl start byonk
CLI Commands
Status (Default)
Running byonk without arguments shows current configuration:
./byonk
Server
Start the HTTP server:
./byonk serve
Render
Render a screen directly to PNG (useful for testing):
./byonk render --mac "00:00:00:00:00:00" --output test.png
Options:
| Option | Description |
|---|---|
-m, --mac | Device MAC address (required) |
-o, --output | Output PNG file path (required) |
-d, --device | Device type: “og” (800x480) or “x” (1872x1404) |
-b, --battery | Battery voltage for testing (e.g., 4.12) |
-r, --rssi | WiFi signal strength for testing (e.g., -67) |
-f, --firmware | Firmware version string for testing |
Example with all device info:
./byonk render -m "AC:15:18:D4:7B:E2" -o test.png \
  --battery=4.12 --rssi=-67 --firmware="1.2.3"
Note: Use
=syntax for negative numbers (e.g.,--rssi=-67).
Init
Extract embedded assets for customization:
./byonk init --all        # Extract everything
./byonk init --screens    # Extract screens only
./byonk init --list       # List embedded assets
Verifying Installation
- Open
http://your-server:3000/health- should return “OK” - Open
http://your-server:3000/swagger-ui- shows API documentation - Point a TRMNL device to your server to test
Configuring Your TRMNL Device
To use Byonk with your TRMNL device, configure the device to point to your server instead of the default TRMNL cloud service.
Note: Refer to TRMNL documentation for instructions on configuring a custom server URL.
Next Steps
- Configure your screens and devices
- Create your first screen
Configuration
Byonk embeds all screens, fonts, and configuration in the binary itself. This means you can run Byonk with zero configuration - it works out of the box.
For customization, Byonk uses a YAML configuration file to define screens and map devices to them.
Configuration Structure
# Screen definitions
screens:
  transit:
    script: transit.lua        # Lua script in screens/
    template: transit.svg      # SVG template in screens/
    default_refresh: 60        # Fallback refresh rate (seconds)

  weather:
    script: weather.lua
    template: weather.svg
    default_refresh: 900

# Device-to-screen mapping
devices:
  "94:A9:90:8C:6D:18":         # Device MAC address
    screen: transit             # Which screen to display
    params:                     # Parameters passed to Lua script
      station: "Olten, Bahnhof"
      limit: 8

  "AA:BB:CC:DD:EE:FF":
    screen: weather
    params:
      city: "Zurich"

# Default screen for unmapped devices
default_screen: default
Screens Section
Each screen definition has three properties:
| Property | Required | Description |
|---|---|---|
script | Yes | Lua script filename (relative to screens/) |
template | Yes | SVG template filename (relative to screens/) |
default_refresh | No | Fallback refresh rate in seconds (default: 900) |
The default_refresh is used when the Lua script returns refresh_rate = 0 or omits it entirely.
Devices Section
Each device entry maps a MAC address to a screen:
| Property | Required | Description |
|---|---|---|
screen | Yes | Name of the screen definition to use |
params | No | Key-value pairs passed to the Lua script |
colors | No | Override display palette (comma-separated hex RGB, e.g. "#000000,#FFFFFF,#FF0000") |
dither | No | Dithering algorithm (see Dither Algorithms below) |
panel | No | Panel profile name (references panels section) |
error_clamp | No | Error clamp for dithering (e.g. 0.08). Limits error diffusion amplitude. |
noise_scale | No | Blue noise jitter scale (e.g. 0.6). Controls noise modulation strength. |
chroma_clamp | No | Chroma clamp for dithering. Limits chromatic error propagation. |
strength | No | Error diffusion strength (0.0–2.0, default 1.0). Lower = less dithering texture. |
MAC Address Format
- Use uppercase letters with colons:
"94:A9:90:8C:6D:18" - The MAC address must be quoted (it’s a YAML string)
Parameters
The params section can contain any YAML values:
params:
  # Strings
  station: "Olten, Bahnhof"

  # Numbers
  limit: 8
  temperature_offset: -2.5

  # Booleans
  show_delays: true

  # Lists
  rooms:
    - "Rosa"
    - "Flora"
These are available in Lua as the global params table:
local station = params.station or "Default Station"
local limit = params.limit or 10
Dither Algorithms
The dither option selects which dithering algorithm to use. All algorithms perform color matching in perceptually uniform Oklab space and process pixels in gamma-correct linear RGB.
| Algorithm | Value | Description |
|---|---|---|
| Atkinson (default) | "atkinson" | Error diffusion (75% propagation). Good general-purpose default. |
| Atkinson Hybrid | "atkinson-hybrid" | Hybrid propagation: 100% achromatic, 75% chromatic. Fixes color drift on chromatic palettes. |
| Floyd-Steinberg | "floyd-steinberg" | Error diffusion with blue noise jitter. Smooth gradients, good general-purpose. |
| Jarvis-Judice-Ninke | "jarvis-judice-ninke" or "jjn" | Wide 12-neighbor kernel. Least oscillation on sparse chromatic palettes. |
| Sierra | "sierra" | 10-neighbor kernel. Good balance of quality and speed. |
| Sierra Two-Row | "sierra-two-row" | 7-neighbor kernel. Lighter weight than full Sierra. |
| Sierra Lite | "sierra-lite" | 3-neighbor kernel. Fastest error diffusion. |
| Stucki | "stucki" | Wide 12-neighbor kernel similar to JJN. |
| Burkes | "burkes" | 7-neighbor kernel. Good balance of speed and quality. |
For most screens, the default "atkinson" works well. Use "atkinson-hybrid" for chromatic palettes where Atkinson shows color drift. Use "floyd-steinberg" for photographic content. For sparse chromatic palettes (e.g. black/white/red/yellow), try "jarvis-judice-ninke" or "sierra" to reduce oscillation artifacts.
Default Screen
The default_screen specifies which screen to show for devices not listed in the devices section:
default_screen: default
If omitted, unknown devices receive an error response.
Device Registration
Byonk supports optional device registration for enhanced security. When enabled, new devices must be explicitly approved before they can display content.
registration:
  enabled: true

devices:
  # Register using the code shown on the device screen
  "ABCDE-FGHJK":
    screen: transit
    params:
      station: "Olten"
How It Works
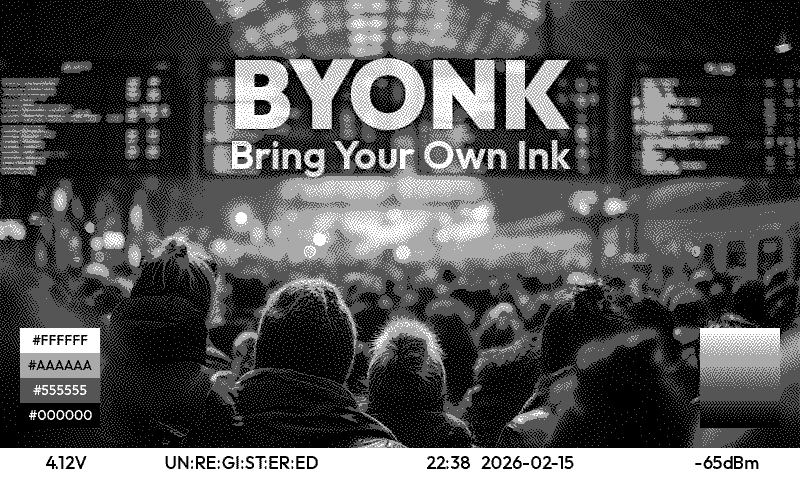
- New device connects - Shows the default screen with a 10-character registration code
- Admin reads code - The code is displayed in 2x5 format on the e-ink screen
- Admin adds code to devices - Add the code (hyphenated format) to the
devicessection - Device refreshes - Now shows the configured screen
Note: The registration code is derived from the device’s API key via a hash function. This means:
- Devices keep their existing API key (including TRMNL-issued keys) - no WiFi reset required
- The same API key always produces the same registration code
- The config shows only the derived code, not the actual API key
Registration Settings
| Property | Required | Description |
|---|---|---|
enabled | No | Enable device registration (default: true) |
screen | No | Custom screen for registration (default: uses default_screen) |
Registration Code Format
- 10 uppercase letters displayed in 2 rows of 5:
A B C D E/F G H J K - Written in config as hyphenated:
"ABCDE-FGHJK" - Uses unambiguous letters only (excludes I, L, O)
- Can be used interchangeably with MAC addresses in the
devicessection - Deterministic: same API key always produces the same code
Example
registration:
  enabled: true

devices:
  # By registration code (read from device screen)
  "ABCDE-FGHJK":
    screen: transit
    params:
      station: "Olten"

  # By MAC address (found in logs)
  "AA:BB:CC:DD:EE:FF":
    screen: weather
Custom Registration Screen
The registration code is available to your default screen as device.registration_code and device.registration_code_hyphenated. Your default.svg can conditionally show it:
{% if device.registration_code %}
<text>Register: {{ device.registration_code_hyphenated }}</text>
{% endif %}
See Device Mapping for more details.
Authentication Mode
Byonk supports optional Ed25519 cryptographic authentication for devices. When enabled, devices use Ed25519 signatures instead of plain API keys.
auth_mode: ed25519 # or "api_key" (default)
The auth_mode setting controls what /api/setup tells devices. The /api/display endpoint always accepts both authentication methods, so existing devices continue to work during migration.
Ed25519 Flow
- Device calls
GET /api/timeto get the server timestamp - Device signs
timestamp_ms (8 bytes BE) || public_key (32 bytes)with its Ed25519 private key - Device sends
X-Public-Key,X-Signature,X-Timestampheaders along with the normalAccess-TokenandIDheaders - Server verifies the signature and checks the timestamp is within ±60 seconds
Settings
| Property | Default | Description |
|---|---|---|
auth_mode | api_key | Authentication mode advertised to devices (api_key or ed25519) |
Hot Reloading
Byonk loads Lua scripts and SVG templates fresh on every request. You can edit these files without restarting the server.
However, config.yaml is only loaded at startup. Changes to device mappings or screen definitions require a server restart.
Example: Complete Configuration
# Byonk Configuration

screens:
  # Default screen - shows time and a message
  default:
    script: default.lua
    template: default.svg
    default_refresh: 300

  # Public transport departures
  transit:
    script: transit.lua
    template: transit.svg
    default_refresh: 60

  # Room booking display
  floerli:
    script: floerli.lua
    template: floerli.svg
    default_refresh: 900

devices:
  # Kitchen display - bus departures
  "94:A9:90:8C:6D:18":
    screen: transit
    params:
      station: "Olten, Südwest"
      limit: 8

  # Office display - room booking
  "AA:BB:CC:DD:EE:FF":
    screen: floerli
    params:
      room: "Rosa"

  # Lobby display - different bus stop
  "BB:CC:DD:EE:FF:00":
    screen: transit
    params:
      station: "Olten, Bahnhof"
      limit: 6

default_screen: default
Panels Section
Panel profiles define the physical characteristics and measured colors of your e-ink displays. They are used for accurate dithering — the ditherer models what the panel really displays, producing better output.
panels:
  trmnl_og_4grey:
    name: "TRMNL OG (4-grey)"
    match: "trmnl_og_4grey"
    width: 800
    height: 480
    colors: "#000000,#555555,#AAAAAA,#FFFFFF"
    colors_actual: "#383838,#787878,#B8B8B0,#D8D8C8"

  trmnl_og_4clr:
    name: "TRMNL OG (4-color)"
    match: "trmnl_og_4clr"
    width: 800
    height: 480
    colors: "#000000,#FFFFFF,#FF0000,#FFFF00"
    colors_actual: "#303030,#D0D0C8,#C04040,#D0D020"
Panel Properties
| Property | Required | Description |
|---|---|---|
name | Yes | Human-readable display name |
match | No | Exact string match against firmware Board header for auto-detection |
width | No | Display width in pixels |
height | No | Display height in pixels |
colors | Yes | Official palette colors (comma-separated hex) |
colors_actual | No | Measured/actual colors the panel really displays |
dither | No | Per-panel dither tuning defaults (see below) |
Panel Dither Defaults
Panels can carry default dither tuning values that apply to all devices using that panel. This avoids repeating the same tuning in every device config entry.
panels:
  trmnl_og_4clr:
    name: "TRMNL OG (4-color)"
    colors: "#000000,#FFFFFF,#FF0000,#FFFF00"
    colors_actual: "#303030,#D0D0C8,#C04040,#D0D020"
    dither:
      error_clamp: 0.1         # flat default for all algorithms
      noise_scale: 5.0
      floyd-steinberg:          # per-algorithm override
        error_clamp: 0.08
        noise_scale: 4.0
      atkinson:
        error_clamp: 0.12
The dither section supports:
- Flat keys (
error_clamp,noise_scale,chroma_clamp,strength): default values for all algorithms - Algorithm sub-sections: per-algorithm overrides that take priority over flat defaults
Resolution within a panel: per-algorithm value > flat default > None.
Algorithm names accept aliases (e.g. jjn for jarvis-judice-ninke).
The overall tuning priority chain is:
| Priority | Source |
|---|---|
| 1 (highest) | Dev UI overrides |
| 2 | Lua script return values |
| 3 | Device config (error_clamp, noise_scale, chroma_clamp, strength) |
| 4 | Panel dither defaults |
| 5 (lowest) | Built-in per-algorithm defaults |
Panel Assignment
Panels are assigned to devices in three ways (highest priority first):
- Device config
panel— explicit assignment in thedevicessection - Board header auto-detection — firmware sends a
Boardheader, matched against panelmatchpatterns - None — firmware palette header or system defaults
devices:
  "ABCDE-FGHJK":
    screen: transit
    panel: trmnl_og_4grey  # explicit panel assignment
When a panel has colors_actual, the ditherer uses these measured values to model what the display really shows. Use dev mode to calibrate and find the right measured colors for your panel.
Customization & File Locations
See Installation for embedded assets, environment variables,
the byonk init command, Docker volume mounts, and file locations.
Next Steps
Dev Mode
Byonk includes a development mode that provides a web-based device simulator with live reload capabilities, making it easier to develop and test screens.
Starting Dev Mode
# Start with dev mode enabled
byonk dev

# With external screens directory for live reload
SCREENS_DIR=./screens byonk dev
Once started, open your browser to http://localhost:3000/dev to access the device simulator.
Features
Device Simulator
The simulator displays your rendered screens in a visual frame resembling a TRMNL device. You can:
- Select a screen from the dropdown (populated from config.yaml and auto-discovered screens)
- Select a device to auto-load its configured screen, parameters, panel, and dither settings
- Simulate device context: battery voltage, WiFi RSSI, and time override
- View the rendered PNG exactly as it would appear on the device
- Pixel inspector: hover over the image to see a magnified view
Live Reload
When SCREENS_DIR is set to an external directory, the dev mode watches for changes to .lua and .svg files. When you save a file:
- The file watcher detects the change
- An event is sent to connected browsers via Server-Sent Events (SSE)
- The screen automatically re-renders with the latest code
Custom Parameters
The dev UI includes a JSON editor for passing custom parameters to your Lua scripts. These are available in your script via the params table.
Error Display
Errors are displayed in a console below the device preview, including Lua syntax/runtime errors, template errors, and render failures.
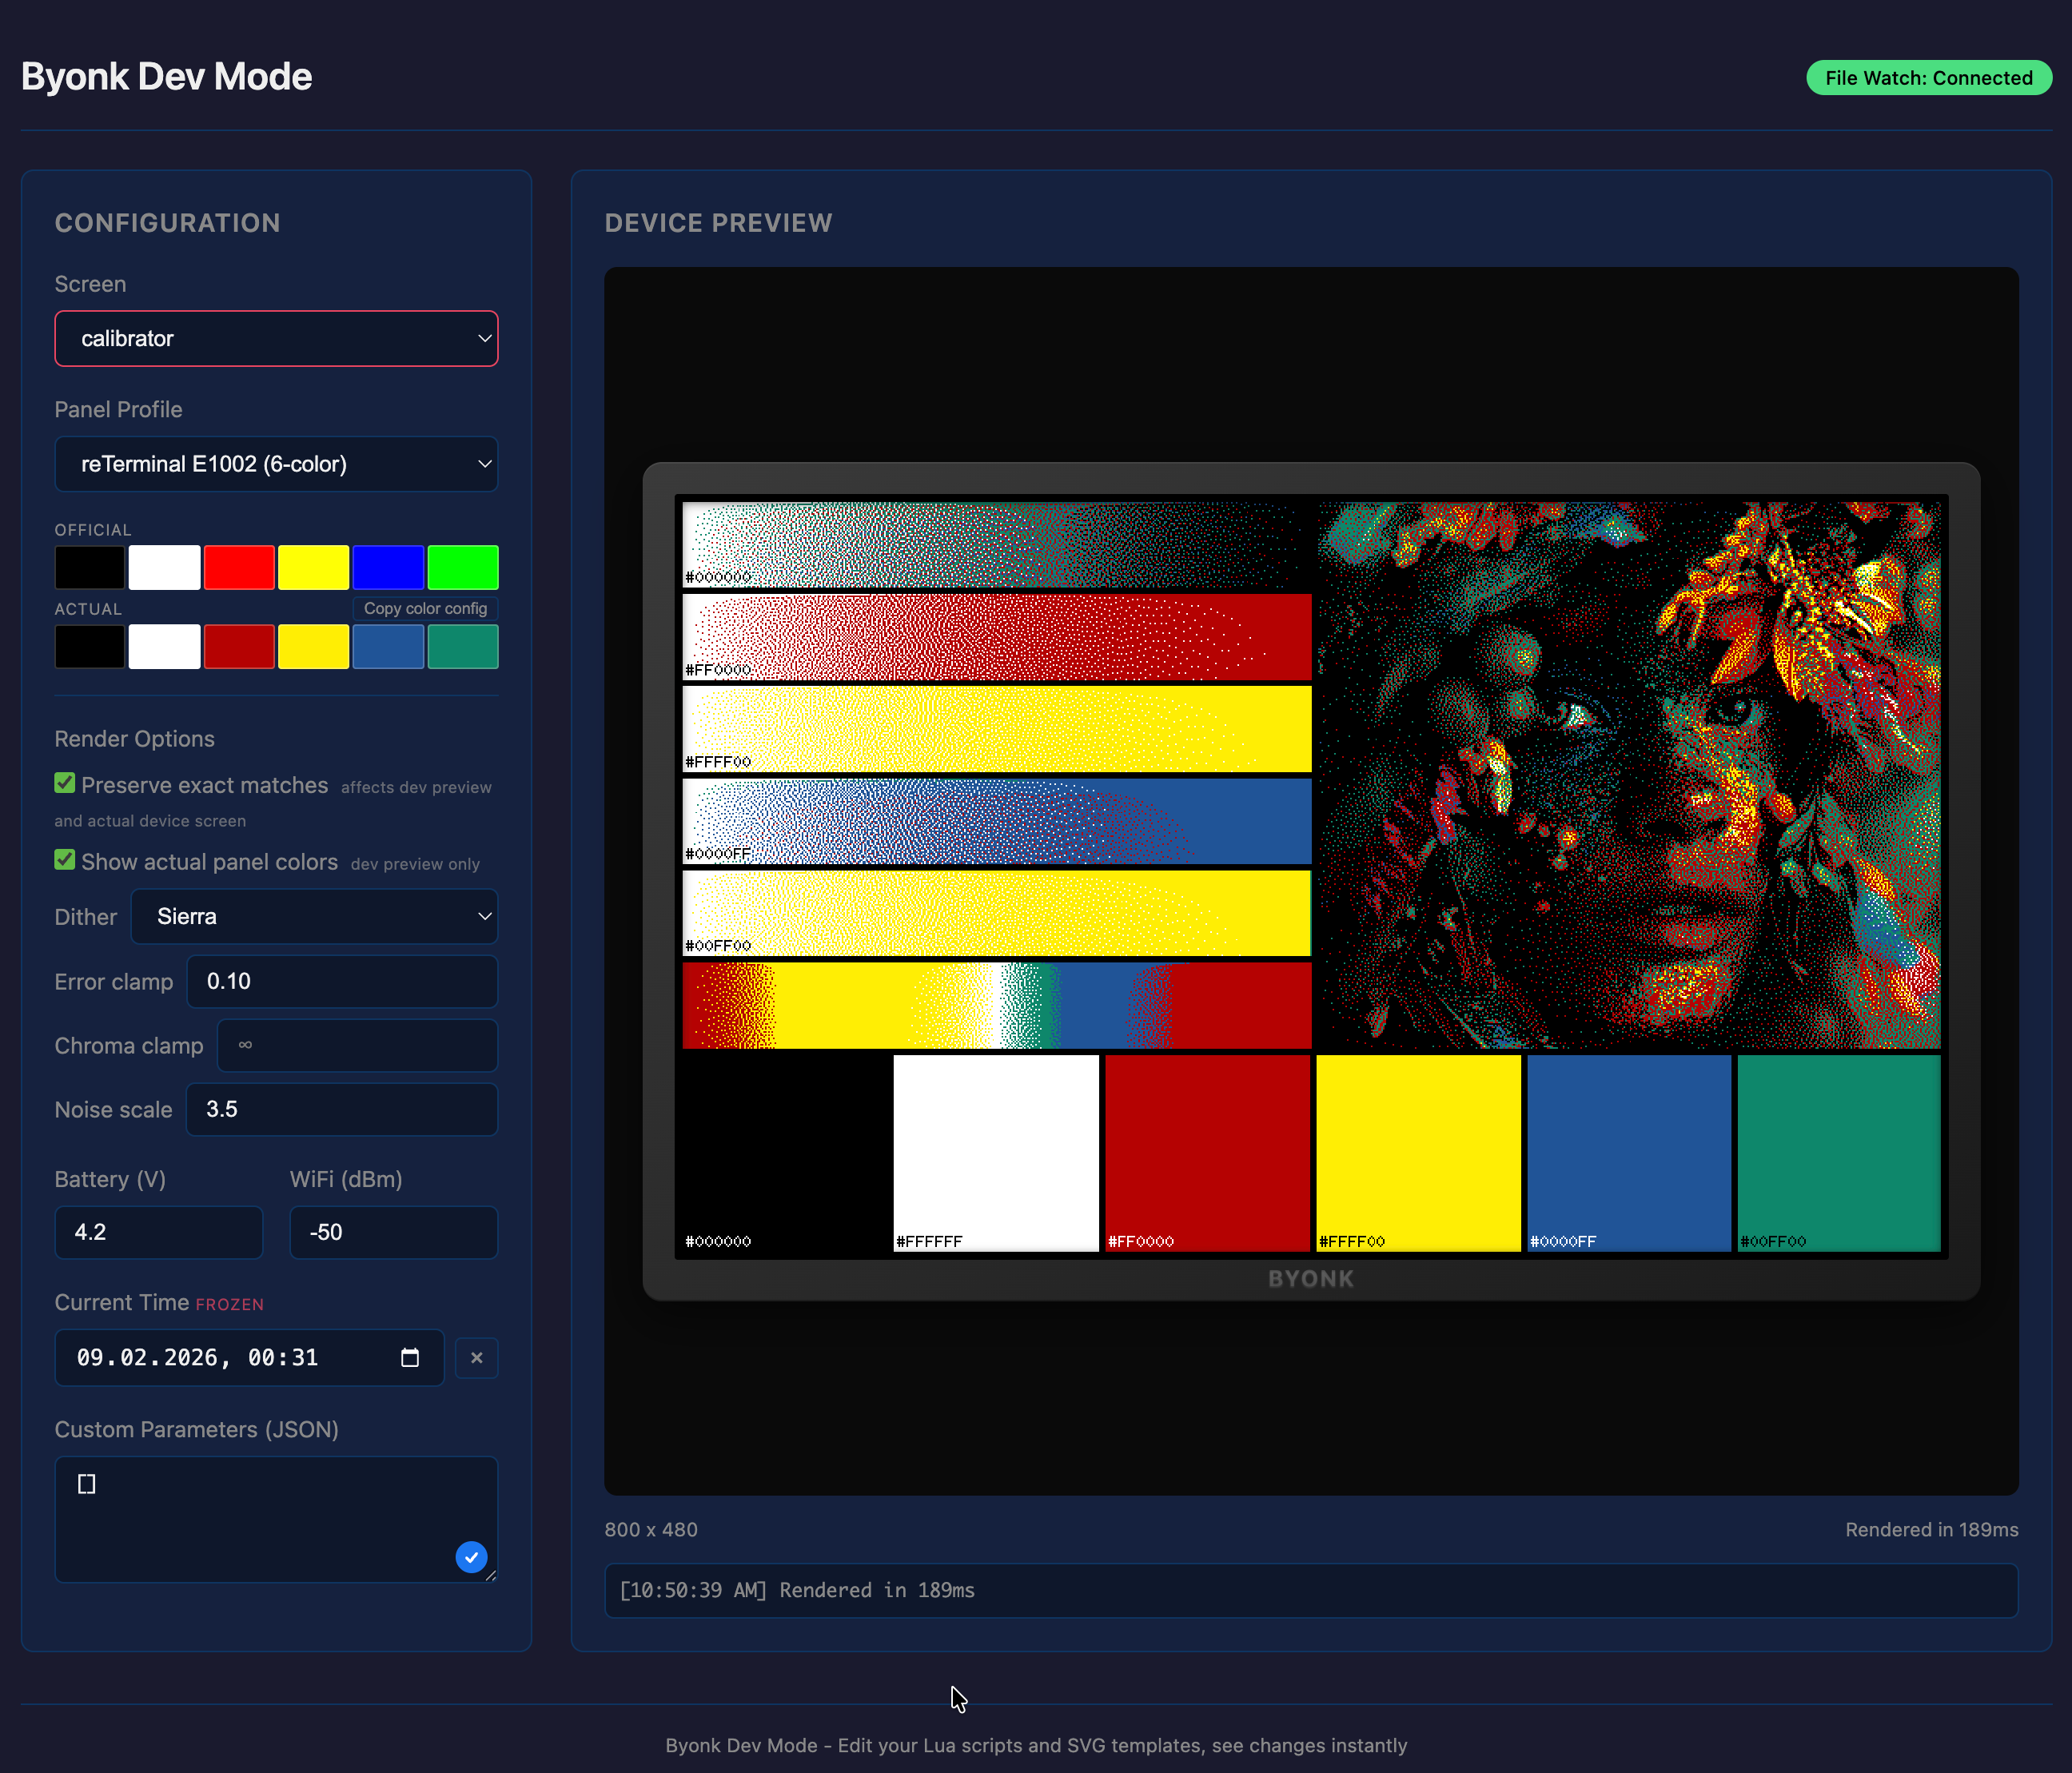
Display Calibration
Dev mode provides tools for calibrating dithering to match your physical display. Changes made in the dev UI are synced live to the actual device — what you tune is what the device shows.
Dither Algorithm Selection
The dither dropdown lets you try all 9 algorithms on your content:
atkinson(default) — Atkinson error diffusion (75% propagation)atkinson-hybrid— Atkinson with hybrid propagation (100% achromatic / 75% chromatic)floyd-steinberg— Floyd-Steinberg with blue noise jitterjarvis-judice-ninke— wide 12-neighbor kernelsierra,sierra-two-row,sierra-lite— Sierra familystucki— wide 12-neighbor kernel similar to JJNburkes— 7-neighbor kernel, good balance of speed and quality
Dither Tuning Controls
The Render Options panel exposes three tuning parameters:
| Control | Effect |
|---|---|
| Error clamp | Limits how much error is diffused. Lower values (0.05–0.1) reduce oscillation in smooth gradients. |
| Noise scale | Controls blue noise jitter strength. Higher values break “worm” artifacts more aggressively. |
| Chroma clamp | Limits chromatic error propagation. Prevents color bleeding on chromatic palettes. |
Color Calibration
Click any actual-color swatch to open the HSL adjustment popup. Adjust hue, saturation, and lightness with live preview to match what your panel really displays. The adjusted colors_actual string can be copied to config.yaml.
Live Device Sync
When you select a device entry and adjust dither algorithm, tuning parameters, or measured colors, changes are synced to the production /api/display handler. The physical device picks up the new settings on its next refresh.
Calibrator Screen
Byonk ships a built-in calibrator screen designed specifically for display calibration. Assign it to your device temporarily while tuning:
devices:
  "ABCDE-FGHJK":
    screen: calibrator
    panel: my_panel
    dither: atkinson
The calibrator shows everything you need to evaluate dithering quality:
- White-to-color gradients for each palette color — reveals error diffusion artifacts, oscillation, and color bleeding
- Full hue sweep at 100% saturation — shows how the ditherer maps arbitrary colors to your limited palette
- Test photo — real-world image to judge overall photo reproduction
- Solid color patches with hex labels — compare what the panel actually displays against the expected color values
Use the calibrator on your physical device while adjusting tuning in dev mode — the live sync means every change you make is immediately visible on the display.
Calibration Workflow
- Assign the
calibratorscreen to your device inconfig.yaml - Select your device in dev mode — this loads its screen, panel, and dither settings
- Choose a dither algorithm that works well for your content type
- Adjust tuning parameters (error_clamp, noise_scale, chroma_clamp, strength) until the preview looks good
- Calibrate measured colors by clicking actual-color swatches and adjusting HSL to match the solid patches on the physical display
- Verify on device — changes sync automatically; wait for the next device refresh
- Commit to config — copy the values to
config.yamland switch back to your normal screen:
panels:
  my_panel:
    name: "My Panel"
    colors: "#000000,#FFFFFF,#FF0000,#FFFF00"
    colors_actual: "#303030,#D0D0C8,#C04040,#D0D020"  # from dev mode calibration

devices:
  "ABCDE-FGHJK":
    screen: gphoto
    panel: my_panel
    dither: floyd-steinberg
    error_clamp: 0.08   # from dev mode tuning
    noise_scale: 0.5    # from dev mode tuning
Tuning values can also be set per-script in the Lua return table — see Lua API.
Configuration
Dev mode uses the same environment variables as the normal server:
| Variable | Description | Default |
|---|---|---|
BIND_ADDR | Server bind address | 0.0.0.0:3000 |
SCREENS_DIR | External screens directory (enables live reload) | (embedded) |
FONTS_DIR | External fonts directory | (embedded) |
CONFIG_FILE | External config file | (embedded) |
Example Workflow
-
Extract embedded assets to work with:
byonk init --all -
Start dev mode with external screens:
SCREENS_DIR=./screens CONFIG_FILE=./config.yaml byonk dev -
Open
http://localhost:3000/devin your browser -
Select the screen you want to work on
-
Edit your Lua script or SVG template — changes appear automatically
-
Use the calibration tools to tune dithering for your panel
-
Check the console below the preview if something goes wrong
Differences from Production
Dev mode includes a few differences from the production byonk serve command:
- Additional
/dev/*routes for the simulator UI - File watching enabled (when using external SCREENS_DIR)
- No content caching — always renders fresh content
- More verbose logging by default
- Tuning and color overrides are session-only (reset on server restart)
Architecture Overview
Byonk is designed as a content server that bridges dynamic data sources with e-ink displays. This page explains how the system is structured and how requests flow through it.
System Overview
flowchart LR
    Display[TRMNL Display]

    subgraph Server[Byonk Server]
        Router[HTTP Router]
        Registry[(Device Registry)]
        Cache[(Content Cache)]
        Lua[Lua Runtime]
        Template[Template Service]
        Renderer[SVG Renderer]
    end

    Display --> Router
    Router --> Registry
    Router --> Cache
    Router --> Lua
    Lua --> Template
    Template --> Renderer
Core Components
HTTP Router
The entry point for all device requests. Built with Axum, it handles:
- Device registration (
/api/setup) - Content requests (
/api/display,/api/image/:id) - Logging (
/api/log) - API documentation (
/swagger-ui)
Device Registry
Stores device information in memory:
- MAC address to API key mapping
- Device metadata (firmware version, model, battery level)
- Last seen timestamps
Note: The current implementation uses an in-memory store. Device registrations are lost on restart. The architecture supports adding database persistence in the future.
Content Cache
Stores rendered content between the display and image requests:
- Caches rendered SVG documents by content hash
- Enables content change detection via hash comparison
- Allows devices to skip unchanged content
Content Pipeline
The heart of Byonk - orchestrates content generation:
- Looks up screen configuration for the device
- Executes Lua script with device parameters
- Renders SVG template with script data
- Converts SVG to PNG with dithering
Lua Runtime
Executes Lua scripts in a sandboxed environment:
- HTTP client for fetching external data
- JSON/HTML parsing utilities
- Time functions
- Logging
Template Service
Renders SVG templates using Tera:
- Jinja2-style syntax
- Custom filters (
truncate,format_time) - Fresh loading on each request (hot reload)
SVG Renderer
Converts SVG to PNG optimized for e-ink:
- Uses resvg for rendering
- Loads custom fonts from
fonts/directory - Palette-aware dithering via eink-dither engine (Oklab color matching, two rendering intents)
- Outputs optimized PNG (greyscale or indexed, depending on palette)
Request Flow
The device-server interaction happens in three phases:
Phase 1: Device Registration
sequenceDiagram
    participant Device as E-ink Display
    participant Router as HTTP Router
    participant Registry as Device Registry

    Device->>+Router: GET /api/setup
    Router->>Registry: lookup/create device
    Registry-->>Router: api_key
    Router-->>-Device: {api_key, friendly_id}
    Note right of Device: Store api_key
Phase 2: Content Generation
sequenceDiagram
    participant Device
    participant Router
    participant Lua
    participant API as External API
    participant Template
    participant Cache

    Device->>+Router: GET /api/display
    Router->>+Lua: execute script
    Lua->>+API: http_get(url)
    API-->>-Lua: JSON data
    Lua-->>-Router: {data, refresh_rate}
    Router->>+Template: render SVG with data
    Template-->>-Router: SVG document
    Router->>Cache: store SVG + hash
    Router-->>-Device: {image_url, filename, refresh_rate}
    Note right of Device: filename is content hash
Phase 3: Image Rendering
sequenceDiagram
    participant Device
    participant Router
    participant Cache
    participant Renderer

    Device->>+Router: GET /api/image/:id
    Router->>Cache: get cached SVG
    Cache-->>Router: SVG document
    Router->>+Renderer: convert to PNG
    Renderer-->>-Router: dithered PNG
    Router-->>-Device: PNG image
    Note right of Device: Display and sleep
Request Details
| Phase | Endpoint | Purpose |
|---|---|---|
| 1. Setup | GET /api/setup | Device registers, receives API key |
| 2. Display | GET /api/display | Runs Lua script, renders SVG, caches it, returns image URL with content hash |
| 3. Image | GET /api/image/:hash | Converts cached SVG to PNG, returns image |
Phase 2 (content generation):
- Load and execute Lua script with
paramsanddevicecontext - Script fetches external data via
http_get() - Render SVG template with script data
- Cache rendered SVG with content hash
- Return image URL and
filename(content hash) to device
The filename field contains a hash of the rendered SVG content. This allows TRMNL devices to detect when content has actually changed, even if the same screen is configured.
Phase 3 (image rendering):
- Look up cached SVG by content hash
- Convert SVG to PNG with palette-aware dithering
- Return PNG to device
Technology Stack
| Component | Technology |
|---|---|
| Web framework | Axum |
| Async runtime | Tokio |
| Scripting | mlua (Lua 5.4) |
| Templating | Tera |
| SVG rendering | resvg (patched for variable fonts) |
| HTTP client | reqwest |
| HTML parsing | scraper |
Design Principles
Fresh Loading
Lua scripts and SVG templates are loaded from disk on every request. This enables:
- Live editing during development
- No restart needed for content changes
- Simple deployment (just copy files)
Blocking Isolation
CPU-intensive operations run in a blocking task pool:
- Lua HTTP requests
- SVG rendering
- Image encoding
This prevents blocking the async event loop.
Graceful Degradation
If content generation fails, devices receive an error screen rather than nothing. The error message helps debugging while keeping the device functional.
Security Model
Content-Based URLs
Image URLs use content hashes instead of signatures:
- URL path contains SHA-256 hash of rendered content
- Same content always produces the same URL
- No expiration - content is immutable by hash
No Authentication Required
The /api/setup endpoint is open - any device can register. This matches TRMNL’s design where devices self-register.
Script Sandboxing
Lua scripts run in a controlled environment:
- Only exposed functions are available
- No filesystem access
- No arbitrary code execution
Content Pipeline
The content pipeline is how Byonk transforms data into images for e-ink displays. This page explains each stage in detail.
Pipeline Overview
flowchart TD
    A[Lua Script] -->|JSON data| B[SVG Template]
    B -->|SVG document| C[Cache]
    C -->|cached SVG| D[Renderer]
    D -->|dithered pixels| E[E-ink PNG]
| Stage | Input | Processing | Output |
|---|---|---|---|
| Lua Script | API endpoints, params | Fetch data, parse JSON/HTML | Structured data |
| SVG Template | Data + device context | Tera templating, layout | SVG document |
| Cache | SVG document | Hash content, store | Cached SVG + content hash |
| Renderer | Cached SVG | Rasterize, dither to palette | Pixel buffer |
| E-ink PNG | Pixel buffer | Encode as greyscale or indexed PNG | Palette PNG |
Content Change Detection
TRMNL devices use the filename field in the /api/display response to detect content changes. Byonk computes a SHA-256 hash of the rendered SVG content and returns it as the filename. This means:
- Same content = same filename: If your Lua script returns identical data and the template produces the same SVG, the device knows nothing changed
- Changed content = new filename: Any change in the rendered SVG (data, template, or device context) produces a new hash
This is why template rendering happens during /api/display rather than /api/image - the hash must be known before the device decides whether to fetch the image.
Stage 1: Lua Script Execution
Lua scripts fetch and process data from external sources.
Input
The script receives a global params table from config.yaml:
# config.yaml
devices:
  "94:A9:90:8C:6D:18":
    screen: transit
    params:
      station: "Olten, Bahnhof"
      limit: 8
-- In your script
local station = params.station  -- "Olten, Bahnhof"
local limit = params.limit      -- 8
Processing
Scripts can:
- Fetch HTTP data: APIs, web pages, JSON endpoints
- Parse content: JSON decoding, HTML scraping
- Transform data: Filter, sort, calculate
local response = http_get("https://api.example.com/data")
local data = json_decode(response)

local filtered = {}
for _, item in ipairs(data.items) do
  if item.active then
    table.insert(filtered, item)
  end
end
Output
Scripts must return a table with two fields:
return {
  data = {
    -- Any structure - passed to template
    title = "My Screen",
    items = filtered,
    updated_at = time_format(time_now(), "%H:%M")
  },
  refresh_rate = 300  -- Seconds until next update
}
Refresh Rate
The refresh_rate controls when the device fetches new content:
- Low values (30-60s): Real-time data (transit, stocks)
- Medium values (300-900s): Regular updates (weather, calendar)
- High values (3600+s): Static content
Tip: Calculate refresh rates dynamically. For transit, refresh after the next departure:
local seconds_until_departure = departure_time - time_now()
return {
  data = departures,
  refresh_rate = seconds_until_departure + 30
}
Stage 2: Template Rendering
SVG templates use Tera syntax (similar to Jinja2).
Input
The template receives a structured context with three namespaces:
Template Namespaces
| Namespace | Source | Description |
|---|---|---|
data.* | Lua script data return | Your script’s output |
device.* | Device headers | Battery voltage, RSSI |
params.* | config.yaml | Device-specific params |
Device Context Variables
These are automatically available under device.* (when reported by the device):
| Variable | Type | Description |
|---|---|---|
device.battery_voltage | float | Battery voltage (e.g., 4.12) |
device.rssi | integer | WiFi signal strength in dBm (e.g., -65) |
<!-- Show battery voltage in header -->
<text x="780" y="30" text-anchor="end">
  {% if device.battery_voltage %}{{ device.battery_voltage | round(precision=2) }}V{% endif %}
</text>
Note: Device info is also available in Lua scripts via the
deviceglobal table.
Syntax
Variables:
<text>{{ data.title }}</text>
<text>{{ data.user.name }}</text>
<text>{{ device.battery_voltage }}V</text>
<text>{{ params.station }}</text>
Loops:
{% for item in data.items %}
<text y="{{ 100 + loop.index0 * 30 }}">{{ item.name }}</text>
{% endfor %}
Conditionals:
{% if data.error %}
<text fill="red">{{ data.error }}</text>
{% else %}
<text>All good!</text>
{% endif %}
Built-in Filters
| Filter | Usage | Description |
|---|---|---|
truncate | {{ data.text | truncate(length=30) }} | Truncate with ellipsis |
format_time | {{ data.ts | format_time(format="%H:%M") }} | Format Unix timestamp |
length | {{ data.items | length }} | Get array/object length |
Output
A complete SVG document ready for rendering.
Stage 3: SVG to PNG Conversion
The renderer converts SVG to a PNG optimized for e-ink displays.
Font Handling
- Custom fonts from
fonts/directory (loaded first) - System fonts as fallback
- Variable fonts supported via CSS
font-variation-settings
<style>
  .title {
    font-family: Outfit;
    font-variation-settings: "wght" 700;
  }
</style>
Scaling
SVGs are scaled to fit the display while maintaining aspect ratio:
- TRMNL OG: 800 × 480 pixels
- TRMNL X: 1872 × 1404 pixels
The image is centered if the aspect ratio doesn’t match exactly.
Palette-Aware Dithering
E-ink displays support a limited color palette (typically 4 grey levels, but also color palettes like black/white/red/yellow). Dithering creates the illusion of more shades by distributing quantization error to neighboring pixels.
Byonk uses the eink-dither engine which performs color matching in the perceptually uniform Oklab color space and processes pixels in gamma-correct linear RGB. This produces more accurate color reproduction than naive RGB-space dithering.
Dither Algorithms
Byonk supports 9 dithering algorithms, selectable per-device or per-script via the dither option:
| Algorithm | Value | Best for |
|---|---|---|
| Atkinson (default) | "atkinson" | General-purpose, good for small palettes |
| Atkinson Hybrid | "atkinson-hybrid" | Chromatic palettes (fixes color drift) |
| Floyd-Steinberg | "floyd-steinberg" | General-purpose, smooth gradients |
| Jarvis-Judice-Ninke | "jarvis-judice-ninke" | Sparse chromatic palettes (least oscillation) |
| Sierra | "sierra" | Good quality/speed balance |
| Sierra Two-Row | "sierra-two-row" | Lighter weight error diffusion |
| Sierra Lite | "sierra-lite" | Fastest error diffusion |
| Stucki | "stucki" | Wide kernel similar to JJN |
| Burkes | "burkes" | Good balance of speed and quality |
All error diffusion algorithms use blue noise jitter to break “worm” artifacts. Color matching is performed in perceptually uniform Oklab space with gamma-correct linear RGB processing.
Set the dither mode per-device in config.yaml:
devices:
  "ABCDE-FGHJK":
    screen: gphoto
    dither: photo
Or per-script by returning dither in the Lua result table:
return {
  data = { ... },
  refresh_rate = 300,
  dither = "photo"
}
The priority chain is: dev UI override > script dither > device config dither > default (graphics).
Dither Tuning
Fine-tune dithering behavior with these parameters, settable at multiple levels:
| Parameter | Description | Typical range |
|---|---|---|
error_clamp | Limits error diffusion amplitude. Lower values reduce oscillation. | 0.05 – 0.5 |
noise_scale | Blue noise jitter scale. Higher values break worm artifacts more aggressively. | 0.3 – 1.0 |
chroma_clamp | Limits chromatic error propagation. Prevents color bleeding. | 0.5 – 5.0 |
strength | Scales diffused error before propagation. 0.0 = no diffusion, 1.0 = standard. | 0.0 – 2.0 |
Use dev mode to find optimal values interactively, then commit them to your panel profile, device config, or Lua script for production use.
Priority chain: dev UI override > script return > device config > panel dither defaults > algorithm defaults.
Panel dither defaults are especially useful because optimal tuning is usually tied to the color palette (which is tied to the panel). Set them once in the panel profile and every device using that panel inherits good defaults. See Panel Dither Defaults for the config format.
Output Format
The final PNG format is chosen automatically based on the palette:
- Grey palette (≤4 colors): Native 2-bit greyscale PNG (4 pixels per byte)
- Grey palette (5-16 colors): Native 4-bit greyscale PNG (2 pixels per byte)
- Color palette: Indexed PNG with PLTE chunk (bit depth chosen by palette size)
- Size validated against device limits (90KB for OG, 750KB for X)
Error Handling
If any stage fails, Byonk generates an error screen:
<svg>
  <rect fill="white" stroke="red" stroke-width="5"/>
  <text>Error: Failed to fetch data</text>
  <text>Will retry in 60 seconds</text>
</svg>
This ensures:
- Device always receives valid content
- Error is visible for debugging
- Automatic retry on next refresh
Performance Considerations
What’s Fast
- Lua script execution (milliseconds)
- Template rendering (milliseconds)
- Simple SVG rendering (10-50ms)
What’s Slower
- HTTP requests (network dependent)
- Complex SVG with many elements (100-500ms)
- Large images or gradients
Optimization Tips
- Minimize HTTP calls - Cache data in script if possible
- Simplify SVG - Fewer elements = faster rendering
- Avoid gradients - They’re converted to dithered patterns anyway
- Use appropriate refresh rates - Don’t refresh more often than needed
Device Mapping
Byonk allows you to show different content on different TRMNL devices. This page explains how devices are identified, registered, and mapped to screens.
How Devices Are Identified
Each TRMNL device has a unique MAC address that identifies it. This address is sent in the ID header with every request:
ID: 94:A9:90:8C:6D:18
Byonk uses this MAC address to:
- Register new devices
- Look up existing device configuration
- Map devices to screens
Device Registration Flow
sequenceDiagram
    participant Device
    participant Byonk

    Device->>Byonk: GET /api/setup<br/>Headers: ID, FW-Version, Model
    Byonk-->>Device: {api_key, friendly_id}
    Note right of Device: Store api_key

    Device->>Byonk: GET /api/display<br/>Headers: Access-Token, ID
    Byonk-->>Device: {image_url, refresh_rate}
Setup Response
{
  "status": 200,
  "api_key": "a1b2c3d4e5f6...",
  "friendly_id": "abc123def456"
}
- api_key: Authentication token for subsequent requests
- friendly_id: Human-readable identifier (12 hex characters)
Configuration-Based Mapping
Devices are mapped to screens in config.yaml:
devices:
  "94:A9:90:8C:6D:18":
    screen: transit
    params:
      station: "Olten, Bahnhof"

  "AA:BB:CC:DD:EE:FF":
    screen: weather
    params:
      city: "Zurich"

default_screen: default
Lookup Order
When a device requests content:
- Exact MAC match - Check if MAC is in
devicessection - Default screen - Use
default_screenif no match - Error - Return error if no default configured
MAC Address Format
MAC addresses in config must be:
- Uppercase:
"94:A9:90:8C:6D:18"not"94:a9:90:8c:6d:18" - Colon-separated:
"94:A9:90:8C:6D:18"not"94-A9-90-8C-6D-18" - Quoted: YAML requires quotes for strings with colons
Device Parameters
See Configuration — Parameters for details on parameter types and usage.
Finding Your Device’s MAC Address
The MAC address is shown:
-
In Byonk logs when the device connects:
INFO Device registered device_id="94:A9:90:8C:6D:18" -
On the device during setup (check TRMNL documentation)
-
In your router’s connected devices list
Default Screen
The default_screen provides a fallback for:
- Devices not yet configured
- New devices during testing
- Backup if config is incorrect
default_screen: default
If no default_screen is set and a device isn’t in the config, it receives an error response.
Auto-Registration
Byonk automatically registers new devices on their first /api/setup call:
- Generates a random API key (32-character hex string)
- Derives a registration code from the key
- Stores device in registry
No pre-configuration is needed - just add the device to config.yaml to assign a custom screen.
Device Registration (Security Feature)
For enhanced security, Byonk supports device registration — requiring new devices to be explicitly approved before showing content.
See Configuration — Device Registration for full setup instructions, registration code format, custom registration screens, and migration notes.
Multiple Screens per Device?
Currently, each device shows one screen. However, you can create a “dashboard” screen that combines multiple data sources:
-- dashboard.lua
local weather = fetch_weather()
local transit = fetch_transit()
local calendar = fetch_calendar()

return {
  data = {
    weather = weather,
    transit = transit,
    calendar = calendar
  },
  refresh_rate = 300
}
Device Metadata
Byonk tracks additional device information from request headers:
| Header | Description |
|---|---|
FW-Version | Firmware version |
Model | Device model (og, x) |
Battery-Voltage | Battery level |
RSSI | WiFi signal strength |
Width, Height | Display dimensions |
This metadata is stored in the device registry and can be used for:
- Debugging connectivity issues
- Monitoring battery levels
- Adapting content to device model
Persistence
Warning: The current implementation stores device registrations in memory. Registrations are lost on server restart.
Devices will automatically re-register on their next request, but any collected metadata is lost.
Future versions may add database persistence for device data.
Tutorial
This tutorial series will teach you how to create custom screens for your TRMNL device using Byonk. You’ll learn:
- Your First Screen - Create a simple “Hello World” screen
- Lua Scripting - Fetch data from APIs and process it
- SVG Templates - Design beautiful layouts
- Advanced Topics - HTML scraping, dynamic refresh, error handling
Prerequisites
Before starting, make sure you have:
- Byonk installed and running
- A text editor for writing Lua and SVG files
- Basic familiarity with programming concepts
Example Screens
Byonk comes with several example screens you can learn from:
Default Screen
A simple clock display showing time and date.
screens/default.lua   - Script
screens/default.svg   - Template
Transit Departures
Real-time public transport departures from Swiss OpenData.
screens/transit.lua   - Fetches from transport.opendata.ch API
screens/transit.svg   - Displays departure list with colors
Room Booking (Floerli)
Scrapes a web page to show room availability.
screens/floerli.lua   - HTML scraping example
screens/floerli.svg   - Shows current/upcoming bookings
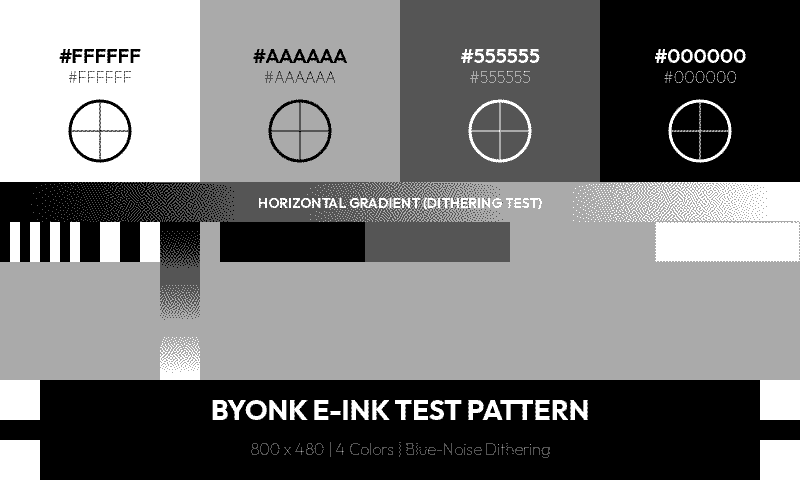
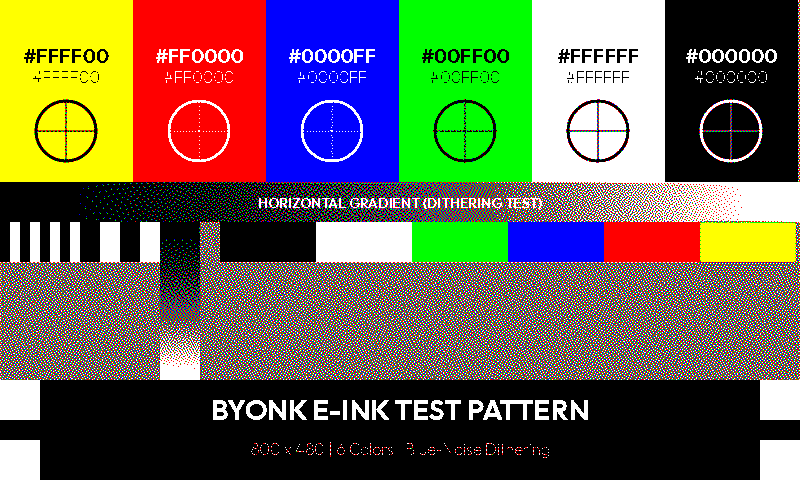
Display Color Test
Demonstrates the display palette colors available on e-ink.
screens/graytest.lua  - Adapts to device palette
screens/graytest.svg  - Shows palette color swatches and dithering test
Quick Reference
File Locations
| Type | Location |
|---|---|
| Lua scripts | screens/*.lua |
| SVG templates | screens/*.svg |
| Configuration | config.yaml |
| Custom fonts | fonts/ |
Workflow
- Create a Lua script and SVG template in
screens/ - Define a screen in
config.yaml - Assign the screen to a device
- Test by refreshing your device or checking
/swagger-ui
Tip: Lua scripts and SVG templates are loaded fresh on every request. Just save your changes and refresh!
Ready to Start?
Head to Your First Screen to create your first custom display!
Your First Screen
Let’s create a simple screen that displays a greeting and the current time. This will introduce you to the basic workflow of creating Byonk screens.
Step 0: Set Up Your Workspace
Byonk embeds all assets in the binary. To customize screens, you must set environment variables pointing to external directories.
For binary users:
# Set paths and start server (auto-seeds empty directories)
export SCREENS_DIR=./screens
export CONFIG_FILE=./config.yaml
byonk serve
For Docker users:
docker run -d --pull always -p 3000:3000 \
  -e SCREENS_DIR=/data/screens \
  -e CONFIG_FILE=/data/config.yaml \
  -v ./data:/data \
  ghcr.io/oetiker/byonk
On first run, empty directories are automatically populated with defaults. You can then edit the files in screens/ and config.yaml.
Tip: Keep the server running in a terminal. Lua scripts and SVG templates are reloaded on every request - just save and refresh!
Step 1: Create the Lua Script
Create a new file screens/hello.lua:
-- Hello World screen
-- Displays a greeting with the current time

local now = time_now()

return {
  data = {
    greeting = "Hello, World!",
    time = time_format(now, "%H:%M:%S"),
    date = time_format(now, "%A, %B %d, %Y")
  },
  refresh_rate = 60  -- Refresh every minute
}
What this does:
time_now()gets the current Unix timestamptime_format()formats it into readable strings- The returned
datatable is passed to the template refresh_ratetells the device to check back in 60 seconds
Step 2: Create the SVG Template
Create a new file screens/hello.svg:
<svg xmlns="http://www.w3.org/2000/svg" viewBox="0 0 800 480" width="800" height="480">
  <style>
    .greeting {
      font-family: Outfit, sans-serif;
      font-size: 48px;
      font-weight: 700;
      fill: black;
    }
    .time {
      font-family: Outfit, sans-serif;
      font-size: 72px;
      font-weight: 700;
      fill: black;
    }
    .date {
      font-family: Outfit, sans-serif;
      font-size: 24px;
      font-weight: 400;
      fill: #555;
    }
    .footer {
      font-family: Outfit, sans-serif;
      font-size: 14px;
      font-weight: 400;
      fill: #999;
    }
  </style>

  <!-- White background -->
  <rect width="800" height="480" fill="white"/>

  <!-- Greeting -->
  <text class="greeting" x="400" y="120" text-anchor="middle">
    {{ data.greeting }}
  </text>

  <!-- Large time display -->
  <text class="time" x="400" y="260" text-anchor="middle">
    {{ data.time }}
  </text>

  <!-- Date below -->
  <text class="date" x="400" y="320" text-anchor="middle">
    {{ data.date }}
  </text>

  <!-- Footer -->
  <text class="footer" x="400" y="450" text-anchor="middle">
    My first Byonk screen!
  </text>
</svg>
Template features used:
{{ data.variable }}- Inserts values from the Lua script’sdatatable- CSS styling for fonts and colors
text-anchor="middle"for centered text
Step 3: Add the Screen to Configuration
Edit config.yaml to add your new screen:
screens:
  # ... existing screens ...

  hello:
    script: hello.lua
    template: hello.svg
    default_refresh: 60
Step 4: Assign to a Device
Still in config.yaml, assign the screen to your device:
devices:
  "YOUR:MAC:AD:DR:ES:S0":
    screen: hello
    params: {}
Replace YOUR:MAC:AD:DR:ES:S0 with your device’s actual MAC address.
Tip: Check the Byonk server logs when your device connects - the MAC address is printed there.
Step 5: Test It
-
Restart Byonk (config.yaml changes require restart)
-
Check the API at
http://localhost:3000/swagger-ui:- Use the
/api/displayendpoint with your device’s MAC - You’ll get an image URL with a content hash
- Open that URL to see your screen!
- Use the
-
Or wait for your device to refresh automatically
Adding Parameters
Let’s make the greeting customizable. Update your files:
screens/hello.lua:
local now = time_now()

-- Get name from params, default to "World"
local name = params.name or "World"

return {
  data = {
    greeting = "Hello, " .. name .. "!",
    time = time_format(now, "%H:%M:%S"),
    date = time_format(now, "%A, %B %d, %Y")
  },
  refresh_rate = 60
}
config.yaml:
devices:
  "YOUR:MAC:AD:DR:ES:S0":
    screen: hello
    params:
      name: "Alice"
Now your screen will say “Hello, Alice!” instead of “Hello, World!”.
Adding a QR Code
Let’s add a QR code to the screen that links to documentation. QR codes are useful for providing quick access to related content.
Update screens/hello.lua:
local now = time_now()
local name = params.name or "World"

return {
  data = {
    greeting = "Hello, " .. name .. "!",
    time = time_format(now, "%H:%M:%S"),
    date = time_format(now, "%A, %B %d, %Y"),
    -- Generate a QR code anchored to bottom-right corner with 10px margin
    qr_code = qr_svg("https://www.youtube.com/watch?v=dQw4w9WgXcQ", {
      anchor = "bottom-right",
      right = 10,
      bottom = 10,
      module_size = 4
    })
  },
  refresh_rate = 60
}
Update screens/hello.svg to include the QR code:
<!-- Add before the closing </svg> tag -->

<!-- QR Code - use 'safe' filter to render SVG -->
{{ data.qr_code | safe }}
The qr_svg() function generates pixel-aligned QR codes optimized for e-ink displays. Use anchor to specify which corner, and top/left/right/bottom for margins from that edge:
| Anchor | Margin options |
|---|---|
top-left | top, left |
top-right | top, right |
bottom-left | bottom, left |
bottom-right | bottom, right |
center | (centered on screen) |
All options:
qr_svg("https://example.com", {
  anchor = "bottom-right", -- Which corner (default: "top-left")
  right = 10,              -- Margin from right edge in pixels
  bottom = 10,             -- Margin from bottom edge in pixels
  module_size = 4,         -- QR "pixel" size (default: 4, recommended: 3-6)
  ec_level = "M",          -- Error correction: L/M/Q/H (default: M)
  quiet_zone = 4           -- QR quiet zone in modules (default: 4)
})
Tip: Use the
| safefilter in templates to render SVG content without escaping.
Understanding the Result
Your screen should look like this:

Troubleshooting
Screen shows error
Check the Byonk logs for script errors:
byonk serve
# Look for ERROR or WARN lines
Template variables not replaced
Make sure your Lua script returns a data table with the expected keys:
return {
  data = {
    greeting = "Hello"  -- Must match {{ greeting }} in template
  },
  refresh_rate = 60
}
Device not updating
- Check that the device MAC in config matches exactly (uppercase, with colons)
- Verify the device is pointing to your Byonk server
- Check device WiFi connectivity
Real-World Example: Transit Departures
Here’s what a more complex screen looks like - the built-in transit departure display:
This screen demonstrates:
- Fetching live data from an API
- Processing JSON responses
- Dynamic refresh rates (updates after each bus departs)
- Styled table layout with alternating rows
- Color-coded line badges
Check out screens/transit.lua and screens/transit.svg in the Byonk source for the complete implementation.
What’s Next?
Now that you have a basic screen working, learn more about:
- Lua Scripting - Fetch data from APIs
- SVG Templates - Create complex layouts
Lua Scripting
Lua scripts are the data engine of Byonk screens. They fetch, process, and transform data before it’s rendered by the template. This guide covers all the APIs available to your scripts.
Script Structure
Every Lua script must return a table with data and refresh_rate:
-- Optional: Use params from config.yaml
local my_param = params.some_key or "default"

-- Your logic here
local result = do_something()

-- Required: Return data for template
return {
  data = {
    -- Passed to SVG template
  },
  refresh_rate = 300  -- Seconds until next refresh
}
Parameters
Device-specific parameters are available via the global params table:
# config.yaml
devices:
  "94:A9:90:8C:6D:18":
    screen: weather
    params:
      city: "Zurich"
      units: "metric"
-- In your script
local city = params.city        -- "Zurich"
local units = params.units      -- "metric"
local missing = params.other    -- nil (not defined)

-- Always provide defaults
local limit = params.limit or 10
HTTP Requests
http_get(url)
Fetches a URL and returns the response body as a string.
local response = http_get("https://api.example.com/data")
Error handling:
local ok, response = pcall(function()
  return http_get("https://api.example.com/data")
end)

if not ok then
  log_error("Request failed: " .. tostring(response))
  return {
    data = { error = "Failed to fetch data" },
    refresh_rate = 60
  }
end
URL encoding:
local city = "Zürich, Schweiz"
local encoded = city:gsub(" ", "%%20"):gsub(",", "%%2C")
local url = "https://api.example.com/city?name=" .. encoded
JSON
json_decode(string)
Parses a JSON string into a Lua table.
local response = http_get("https://api.example.com/data")
local data = json_decode(response)

-- Access fields
local name = data.name
local items = data.items
local first = data.items[1]  -- Lua arrays are 1-indexed!
json_encode(table)
Converts a Lua table to a JSON string.
local data = { name = "test", values = {1, 2, 3} }
local json_str = json_encode(data)
-- '{"name":"test","values":[1,2,3]}'
HTML Parsing
For scraping web pages, Byonk provides CSS selector-based HTML parsing.
html_parse(html)
Parses an HTML string and returns a document object.
local html = http_get("https://example.com")
local doc = html_parse(html)
doc:select(selector)
Queries elements using CSS selectors. Returns an elements collection.
local links = doc:select("a.nav-link")
local rows = doc:select("table.data tr")
local header = doc:select("h1")
doc:select_one(selector)
Returns only the first matching element (or nil).
local title = doc:select_one("title")
if title then
  log_info("Page title: " .. title:text())
end
elements:each(fn)
Iterates over matched elements.
local items = {}
doc:select("ul.list li"):each(function(el)
  table.insert(items, {
    text = el:text(),
    link = el:attr("href")
  })
end)
element:text()
Gets the inner text content.
local heading = doc:select_one("h1")
local text = heading:text()  -- "Welcome to Example"
element:attr(name)
Gets an attribute value.
local link = doc:select_one("a")
local href = link:attr("href")   -- "https://..."
local class = link:attr("class") -- "nav-link"
element:html()
Gets the inner HTML.
local div = doc:select_one("div.content")
local inner_html = div:html()
Example: Scraping a Table
local html = http_get("https://example.com/data")
local doc = html_parse(html)

local rows = {}
doc:select("table tbody tr"):each(function(row)
  local cells = {}
  row:select("td"):each(function(cell)
    table.insert(cells, cell:text())
  end)

  if #cells >= 2 then
    table.insert(rows, {
      name = cells[1],
      value = cells[2]
    })
  end
end)

return {
  data = { rows = rows },
  refresh_rate = 900
}
Time Functions
time_now()
Returns the current Unix timestamp (seconds since 1970).
local now = time_now() -- e.g., 1703672400
time_format(timestamp, format)
Formats a timestamp into a string using strftime patterns.
local now = time_now()

time_format(now, "%H:%M")        -- "14:32"
time_format(now, "%H:%M:%S")     -- "14:32:05"
time_format(now, "%Y-%m-%d")     -- "2024-12-27"
time_format(now, "%A")           -- "Friday"
time_format(now, "%B %d, %Y")    -- "December 27, 2024"
Common format codes:
| Code | Description | Example |
|---|---|---|
%H | Hour (24h) | 14 |
%M | Minute | 32 |
%S | Second | 05 |
%Y | Year | 2024 |
%m | Month | 12 |
%d | Day | 27 |
%A | Weekday name | Friday |
%B | Month name | December |
%a | Short weekday | Fri |
%b | Short month | Dec |
time_parse(string, format)
Parses a date string into a Unix timestamp.
local ts = time_parse("2024-12-27 14:30", "%Y-%m-%d %H:%M")
Logging
Write messages to the Byonk server logs.
log_info("Processing request for station: " .. station)
log_warn("API returned empty response")
log_error("Failed to parse JSON: " .. err)
Logs appear in the server output:
INFO script=true: Processing request for station: Olten
WARN script=true: API returned empty response
ERROR script=true: Failed to parse JSON: unexpected token
Complete Example: Transit API
Here’s a real-world example fetching transit data:
-- transit.lua - Fetch public transport departures

local station = params.station or "Olten"
local limit = params.limit or 8

log_info("Fetching departures for: " .. station)

-- URL encode the station name
local encoded = station:gsub(" ", "%%20"):gsub(",", "%%2C")
local url = "https://transport.opendata.ch/v1/stationboard"
      .. "?station=" .. encoded
      .. "&limit=" .. limit

-- Fetch with error handling
local ok, response = pcall(function()
  return http_get(url)
end)

if not ok then
  log_error("API request failed: " .. tostring(response))
  return {
    data = {
      station = station,
      error = "Failed to fetch departures",
      departures = {}
    },
    refresh_rate = 60
  }
end

-- Parse JSON
local json = json_decode(response)

-- Transform data for template
local departures = {}
local now = time_now()

for i, dep in ipairs(json.stationboard or {}) do
  local departure_time = dep.stop and dep.stop.departure or ""
  local hour, min = departure_time:match("T(%d+):(%d+)")

  table.insert(departures, {
    time = hour and (hour .. ":" .. min) or "??:??",
    line = (dep.category or "") .. (dep.number or ""),
    destination = dep.to or "Unknown",
    delay = dep.stop and dep.stop.delay or 0
  })
end

-- Calculate smart refresh rate
local refresh_rate = 300
if #departures > 0 and json.stationboard[1].stop then
  local first_dep = json.stationboard[1].stop.departureTimestamp
  if first_dep then
    local seconds_until = first_dep - now
    refresh_rate = math.max(30, math.min(seconds_until + 30, 900))
  end
end

log_info("Found " .. #departures .. " departures, refresh in " .. refresh_rate .. "s")

return {
  data = {
    station = json.station and json.station.name or station,
    departures = departures,
    updated_at = time_format(now, "%H:%M")
  },
  refresh_rate = refresh_rate
}
Tips & Best Practices
Always Handle Errors
local ok, result = pcall(function()
  return http_get(url)
end)

if not ok then
  return { data = { error = "..." }, refresh_rate = 60 }
end
Provide Default Values
local limit = params.limit or 10
local show_delays = params.show_delays or true
Log for Debugging
log_info("Params: " .. json_encode(params))
log_info("Fetched " .. #items .. " items")
Keep It Simple
Scripts run on every request. Avoid:
- Complex computations
- Multiple HTTP requests when one will do
- Parsing more data than needed
Use Smart Refresh Rates
Don’t refresh more often than necessary:
-- Real-time data: 30-60 seconds
-- Regular updates: 300-900 seconds
-- Static content: 3600+ seconds
Next Steps
- SVG Templates - Design the visual layout
- Advanced Topics - Error handling, caching strategies
SVG Templates
SVG templates define the visual layout of your screens. They use Tera templating syntax to insert data from your Lua scripts.
Template Basics
A Byonk SVG template is a standard SVG file with Tera expressions:
<svg xmlns="http://www.w3.org/2000/svg" viewBox="0 0 800 480" width="800" height="480">
  <rect width="800" height="480" fill="white"/>

  <text x="400" y="240" text-anchor="middle" font-size="24">
    {{ message }}
  </text>
</svg>
Key points:
- Set
viewBoxto0 0 800 480for TRMNL OG (or0 0 1872 1404for TRMNL X) - Always include
widthandheightattributes - Use
{{ variable }}to insert values from Lua
Display Dimensions
| Device | Width | Height | Aspect Ratio |
|---|---|---|---|
| TRMNL OG | 800 | 480 | 5:3 |
| TRMNL X | 1872 | 1404 | 4:3 |
Byonk automatically scales your SVG to fit the display, but matching the aspect ratio gives the best results.
Variables
Template Namespaces
Variables in templates are organized into four namespaces:
| Namespace | Source | Example |
|---|---|---|
data.* | Lua script return value | data.title, data.items |
device.* | Device info (battery, signal) | device.battery_voltage, device.rssi |
params.* | Config params from config.yaml | params.station, params.limit |
layout.* | Pre-computed layout values | layout.width, layout.grey_count |
Device Variables
These are automatically available under device.*:
| Variable | Type | Description |
|---|---|---|
device.mac | string | Device MAC address (e.g., “AC:15:18:D4:7B:E2”) |
device.battery_voltage | float or nil | Battery voltage (e.g., 4.12) |
device.rssi | integer or nil | WiFi signal strength in dBm (e.g., -65) |
device.model | string or nil | Device model (“og” or “x”) |
device.firmware_version | string or nil | Firmware version string |
device.width | integer or nil | Display width in pixels (800 or 1872) |
device.height | integer or nil | Display height in pixels (480 or 1404) |
<!-- Display battery and signal in header -->
<text class="status" x="780" y="25" text-anchor="end">
  {% if device.battery_voltage %}{{ device.battery_voltage | round(precision=2) }}V{% endif %}
  {% if device.rssi %} · {{ device.rssi }}dBm{% endif %}
</text>

<!-- Responsive layout based on device dimensions -->
{% if device.width == 1872 %}
  <!-- TRMNL X layout (1872x1404) -->
{% else %}
  <!-- TRMNL OG layout (800x480) -->
{% endif %}
Note: Some device variables may be
nilif the device doesn’t report them. Always use{% if device.variable %}to check before using.
Layout Variables
Pre-computed layout values are available under layout.*. These mirror the layout table available in Lua scripts:
| Variable | Type | Description |
|---|---|---|
layout.width | integer | Display width in pixels (default 800) |
layout.height | integer | Display height in pixels (default 480) |
layout.scale | float | Scale factor relative to 800×480 base |
layout.center_x | integer | Horizontal center (width / 2) |
layout.center_y | integer | Vertical center (height / 2) |
layout.margin | integer | Standard margin (20px × scale) |
layout.margin_sm | integer | Small margin (10px × scale) |
layout.margin_lg | integer | Large margin (40px × scale) |
layout.colors | array | Display color palette (hex strings) |
layout.color_count | integer | Number of colors in palette (default 4) |
layout.grey_count | integer | Number of grey levels in palette (default 4) |
This is useful for conditional logic in SVG templates without needing Lua to pass the values through — for example, the components/hinting.svg include uses layout.grey_count to switch between mono and smooth font hinting.
Basic Interpolation
<text>{{ data.title }}</text>
<text>{{ data.user.name }}</text>
<text>{{ data.items[0].label }}</text>
Filters
Apply filters to modify values:
<!-- Truncate long text -->
<text>{{ data.description | truncate(length=50) }}</text>

<!-- Format timestamp (uses UTC) -->
<text>{{ data.updated_at | format_time(format="%H:%M") }}</text>

<!-- Get length -->
<text>{{ data.items | length }} items</text>
Tip: The
format_timetemplate filter uses UTC timezone. For local time formatting, usetime_format()in your Lua script and pass the pre-formatted string to the template.
Default Values
<text>{{ data.title | default(value="Untitled") }}</text>
Control Flow
Conditionals
{% if data.error %}
  <text fill="red">Error: {{ data.error }}</text>
{% else %}
  <text>All systems operational</text>
{% endif %}
Comparisons
{% if data.count > 0 %}
  <text>{{ data.count }} items</text>
{% elif data.count == 0 %}
  <text>No items</text>
{% endif %}

{% if data.status == "active" %}
  <circle fill="green" r="10"/>
{% endif %}
Boolean Checks
{% if data.is_online %}
  <text fill="green">Online</text>
{% endif %}

{% if not data.items %}
  <text>No data available</text>
{% endif %}
Loops
Basic Loop
{% for item in data.items %}
  <text y="{{ 100 + loop.index0 * 30 }}">{{ item.name }}</text>
{% endfor %}
Loop Variables
| Variable | Description |
|---|---|
loop.index | Current iteration (1-indexed) |
loop.index0 | Current iteration (0-indexed) |
loop.first | True on first iteration |
loop.last | True on last iteration |
Positioning with Loops
{% for dep in data.departures %}
  <!-- Calculate Y position based on index -->
  <text y="{{ 80 + loop.index0 * 40 }}">
    {{ dep.time }} - {{ dep.destination }}
  </text>
{% endfor %}
Conditional Styling in Loops
{% for item in data.items %}
  <!-- Alternating row backgrounds -->
  {% if loop.index0 is odd %}
    <rect y="{{ 100 + loop.index0 * 40 }}" width="800" height="40" fill="#f5f5f5"/>
  {% endif %}

  <text y="{{ 125 + loop.index0 * 40 }}">{{ item.name }}</text>
{% endfor %}
Empty State
{% if data.items | length > 0 %}
  {% for item in data.items %}
    <text>{{ item.name }}</text>
  {% endfor %}
{% else %}
  <text fill="#999">No items found</text>
{% endif %}
Styling
Inline Styles
<text x="20" y="40"
      font-family="sans-serif"
      font-size="24"
      font-weight="bold"
      fill="black">
  {{ data.title }}
</text>
CSS in Style Block
<svg xmlns="http://www.w3.org/2000/svg" viewBox="0 0 800 480">
  <style>
    .title { font-family: sans-serif; font-size: 32px; font-weight: bold; }
    .subtitle { font-family: sans-serif; font-size: 18px; fill: #666; }
    .highlight { fill: #333; font-weight: bold; }
  </style>

  <text class="title" x="20" y="40">{{ data.title }}</text>
  <text class="subtitle" x="20" y="70">{{ data.subtitle }}</text>
</svg>
Variable Fonts
Byonk supports variable fonts via CSS font-variation-settings:
<style>
  .light { font-family: Outfit; font-variation-settings: "wght" 300; }
  .regular { font-family: Outfit; font-variation-settings: "wght" 400; }
  .bold { font-family: Outfit; font-variation-settings: "wght" 700; }
</style>
Note: Place custom font files (e.g.,
Outfit-Variable.ttf) in thefonts/directory.
Colors and Palettes
E-ink displays support a limited color palette. The default 4-grey OG palette is #000000, #555555, #AAAAAA, #FFFFFF, but color displays may have palettes like #000000, #FFFFFF, #FF0000, #FFFF00. The display palette is available in Lua via layout.colors.
The palette follows a priority chain: Lua script colors return > device config colors > firmware Colors header > system default. You can override the palette per-device in config.yaml:
devices:
  "ABCDE-FGHJK":
    screen: transit
    colors: "#000000,#FFFFFF,#FF0000"
Or per-script by returning colors in the Lua result table (see Lua API: colors).
Dithering Mode
Byonk supports two dithering modes via the dither option:
graphics(default) — Blue noise ordered dithering, best for UI contentphoto— Atkinson error diffusion, best for photographs
Set per-device in config.yaml or per-script in the Lua return table (see Lua API: dither and Content Pipeline: Rendering Intents).
Using Palette Colors
For the cleanest output, use colors from the display palette directly. Byonk will dither any color to the nearest palette color, but exact palette matches are preserved without dithering.
-- In your Lua script
local colors = layout.colors  -- e.g., {"#000000", "#555555", "#AAAAAA", "#FFFFFF"}
<!-- Use palette colors for crisp rendering -->
{% for swatch in data.swatches %}
<rect x="{{ swatch.x }}" width="{{ swatch.width }}" height="100" fill="{{ swatch.color }}"/>
{% endfor %}
Testing Display Colors
The included graytest screen adapts to the device palette and shows all available colors as swatches with gradient and dithering tests.
4-grey palette (TRMNL OG default):
6-color palette (color e-ink display):
The default screen also adapts to the palette:
Avoid
- Gradients - Convert to dithered patterns (may look noisy)
- Subtle color differences - May become indistinguishable on limited palettes
- Colors not in palette - Will be dithered to nearest match
Font Rendering for E-ink
Byonk uses a patched version of resvg for SVG rendering, which adds font hinting support with custom CSS properties for fine-tuning. Getting these right makes a big difference on e-ink displays, where there are few (or no) gray levels to smooth out font edges.
Available Properties
| Property | Values | Default | Description |
|---|---|---|---|
-resvg-hinting-target | smooth, mono | smooth | mono for 1-bit displays, smooth for displays with gray levels |
-resvg-hinting-mode | normal, light, lcd, vertical-lcd | normal | Hinting strength. normal = strongest grid-fitting, light = softer |
-resvg-hinting-engine | auto-fallback, auto, native | auto-fallback | auto uses FreeType’s auto-hinter (more consistent), native uses the font’s built-in hints |
-resvg-hinting-symmetric | true, false | true | Symmetric rasterization. false can improve consistency at small sizes |
-resvg-hinting-preserve-linear-metrics | true, false | false | true forces uniform glyph spacing |
shape-rendering | auto, crispEdges, geometricPrecision | auto | crispEdges disables anti-aliasing on shapes and lines |
text-rendering | auto, optimizeSpeed, optimizeLegibility, geometricPrecision | auto | Hint for text rendering quality |
Recommended Presets
1-bit display (black & white only):
text {
  -resvg-hinting-target: mono;
  -resvg-hinting-mode: normal;
  -resvg-hinting-engine: auto;
  -resvg-hinting-symmetric: false;
  -resvg-hinting-preserve-linear-metrics: true;
  shape-rendering: crispEdges;
}
4 gray levels:
text {
  -resvg-hinting-target: smooth;
  -resvg-hinting-mode: normal;
  -resvg-hinting-engine: auto;
  shape-rendering: crispEdges;
}
16 gray levels:
text {
  -resvg-hinting-target: smooth;
  -resvg-hinting-mode: light;
  -resvg-hinting-engine: auto;
}
Adaptive Hinting
The components/hinting.svg include automatically applies the right hinting settings based on the display’s grey levels:
<style>
  text {
    {% include "components/hinting.svg" %}
  }
</style>
On black-and-white displays (grey_count <= 2) it enables mono hinting with crispEdges; on displays with more grey levels it uses smooth hinting. All built-in screens use this component.
Hinting Demo Screen
The built-in hintdemo screen provides a visual comparison of all hinting engine and target combinations in a 3×3 grid:
- Columns: mono, normal (smooth), light (smooth)
- Rows: auto engine, native engine, no hinting
Enable it in your config.yaml to see how different settings affect text rendering at various font sizes on your actual display.
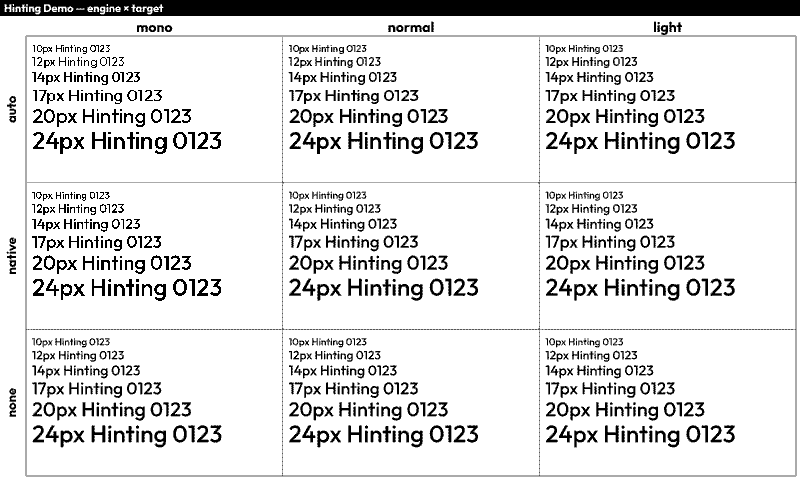
Tips
- Use the
autoengine. The FreeType auto-hinter applies a consistent algorithm to all glyphs. Native font hints vary in quality and can produce inconsistent letterforms (e.g., the same letter rendering differently at the same size). - Choose font sizes that land on whole pixel boundaries. Fractional pixel heights cause glyphs to snap to the grid differently, producing inconsistent shapes.
shape-rendering: crispEdgeseliminates anti-aliased edges on lines and rectangles — important when there are few gray levels to work with.- Test on your actual display. Optimal settings depend on the font, font size, and display capabilities. The presets above are starting points.
Bitmap Fonts
Byonk ships with X11 bitmap fonts converted to TTF files. These contain embedded bitmap strikes — pre-rendered glyphs at specific pixel sizes — which produce perfectly crisp text on e-ink displays without any hinting artifacts.
Available Families
Proportional fonts:
| Family | Styles | Pixel Sizes |
|---|---|---|
| X11Helv | Regular, Bold, Oblique, BoldOblique | 8, 10, 11, 12, 14, 17, 18, 20, 24, 25, 34 |
| X11LuSans | Regular, Bold, Oblique, BoldOblique | 8–34 (13 sizes) |
| X11LuType | Regular, Bold | 8–34 (13 sizes) |
| X11Term | Regular, Bold | 14, 18 |
Fixed-width fonts (grouped by cell width):
| Family | Styles | Pixel Sizes |
|---|---|---|
| X11Misc5x | Regular | 6, 7, 8 |
| X11Misc6x | Regular, Bold, Oblique | 9, 10, 12, 13 |
| X11Misc7x | Regular, Bold, Oblique | 13, 14 |
| X11Misc8x | Regular, Bold, Oblique | 13, 16 |
| X11Misc9x | Regular, Bold | 15, 18 |
| X11Misc10x | Regular | 20 |
| X11Misc12x | Regular | 24 |
Usage
Set font-family to the family name and font-size to a pixel size that matches a bitmap strike. The renderer automatically selects the closest strike:
<text font-family="X11Helv" font-size="14">Proportional text</text>
<text font-family="X11Helv" font-size="14" font-weight="700">Bold</text>
<text font-family="X11Misc7x" font-size="13">Fixed width</text>
<text font-family="X11Misc7x" font-size="13" font-style="oblique">Fixed oblique</text>
For sizes without an exact bitmap strike, autotraced scalable outlines are used as fallback — but these won’t look as clean as the native bitmap sizes.
Bitmap Font Demo Screen
The built-in fontdemo-bitmap screen showcases all sizes and styles for a given font family. Configure it with the font_prefix parameter:
screens:
  fontdemo-bitmap:
    params:
      font_prefix: X11Helv   # or X11LuSans, X11LuType, X11Term, X11Misc
This renders each available size and style combination as a labeled line, useful for picking the right font and size for your screen.

Layout Patterns
Header + Content
<svg xmlns="http://www.w3.org/2000/svg" viewBox="0 0 800 480">
  <!-- Header bar -->
  <rect width="800" height="70" fill="black"/>
  <text x="30" y="48" fill="white" font-size="28">{{ data.title }}</text>
  <text x="770" y="48" fill="#aaa" font-size="14" text-anchor="end">{{ data.time }}</text>

  <!-- Content area -->
  <g transform="translate(0, 70)">
    <!-- Your content here, Y coordinates start at 0 -->
  </g>
</svg>
Grid Layout
{% for item in data.items %}
  {% set col = loop.index0 % 3 %}
  {% set row = loop.index0 // 3 %}

  <rect x="{{ col * 266 }}" y="{{ 80 + row * 100 }}"
        width="260" height="90" fill="#f0f0f0" rx="5"/>
  <text x="{{ col * 266 + 130 }}" y="{{ 130 + row * 100 }}"
        text-anchor="middle">{{ item.name }}</text>
{% endfor %}
Two Columns
<!-- Left column -->
<text x="30" y="100">Left content</text>

<!-- Divider -->
<line x1="400" y1="80" x2="400" y2="450" stroke="#ccc"/>

<!-- Right column -->
<text x="430" y="100">Right content</text>
Dynamic Styling
Conditional Colors
{% for item in data.items %}
  <text fill="{% if item.is_urgent %}red{% else %}black{% endif %}">
    {{ item.name }}
  </text>
{% endfor %}
Dynamic Classes
<text class="{% if data.count > 100 %}highlight{% else %}normal{% endif %}">
  {{ data.count }}
</text>
Status Indicators
{% if data.status == "online" %}
  <circle cx="20" cy="20" r="8" fill="green"/>
{% elif data.status == "warning" %}
  <circle cx="20" cy="20" r="8" fill="orange"/>
{% else %}
  <circle cx="20" cy="20" r="8" fill="red"/>
{% endif %}
Common Patterns
Truncating Long Text
<text>
  {% if data.title | length > 30 %}
    {{ data.title | truncate(length=30) }}
  {% else %}
    {{ data.title }}
  {% endif %}
</text>
Formatted Numbers
Use Lua to format numbers before passing to template:
-- In Lua script
return {
  data = {
    temperature = string.format("%.1f°C", temp),
    price = string.format("$%.2f", amount)
  }
}
Time-Based Styling
-- In Lua script
local hour = tonumber(time_format(time_now(), "%H"))
return {
  data = {
    is_night = hour < 6 or hour > 20
  }
}
<rect width="800" height="480" fill="{% if is_night %}#333{% else %}white{% endif %}"/>
Debugging Templates
Show Raw Data
<!-- Temporarily add this to see all data -->
<text x="10" y="460" font-size="10" fill="#999">
  Debug: {{ data.items | length }} items
</text>
Check for Missing Data
{% if not data.title %}
  <text fill="red">ERROR: title is missing!</text>
{% endif %}
Template Errors
If your template has a syntax error, Byonk will display an error screen with the message. Check the server logs for details.
Embedding Images
Byonk supports embedding images in your SVG templates. You can include PNG, JPEG, GIF, WebP, and SVG files.
Asset Directory Structure
Place your screen assets in a subdirectory matching your screen name:
screens/
├── hello.lua         # Script at top level
├── hello.svg         # Template at top level
└── hello/            # Assets for "hello" screen
    ├── logo.png
    ├── icon.svg
    └── background.jpg
Method 1: Direct in SVG (Automatic Resolution)
Simply reference images by filename in your SVG template. Byonk automatically resolves relative paths to the screen’s asset directory and embeds them as data URIs:
<svg xmlns="http://www.w3.org/2000/svg" viewBox="0 0 800 480">
  <!-- This automatically loads screens/hello/logo.png -->
  <image x="10" y="10" width="64" height="64" href="logo.png"/>

  <text x="100" y="50">{{ data.greeting }}</text>
</svg>
Supported image formats:
- PNG (
.png) - JPEG (
.jpg,.jpeg) - GIF (
.gif) - WebP (
.webp) - SVG (
.svg)
Notes:
- Paths are relative to the screen’s asset directory
- URLs starting with
data:,http://, orhttps://are left unchanged - Missing images log a warning but don’t break rendering
Method 2: Via Lua (For Dynamic Images)
For more control, use read_asset() and base64_encode() in your Lua script:
screens/hello.lua:
local icon = read_asset("icon.png")

return {
    data = {
        greeting = "Hello World!",
        icon_src = "data:image/png;base64," .. base64_encode(icon)
    },
    refresh_rate = 3600
}
screens/hello.svg:
<svg xmlns="http://www.w3.org/2000/svg" viewBox="0 0 800 480">
  <image x="10" y="10" width="64" height="64" href="{{ data.icon_src }}"/>
  <text x="100" y="50">{{ data.greeting }}</text>
</svg>
This method is useful when you need to:
- Conditionally include images
- Fetch images from external URLs
- Process or transform image data
Background Images
To use a full-screen background image:
<svg xmlns="http://www.w3.org/2000/svg" viewBox="0 0 800 480" width="800" height="480">
  <!-- Background image -->
  <image x="0" y="0" width="800" height="480" href="background.png" preserveAspectRatio="xMidYMid slice"/>

  <!-- Content on top -->
  <text x="400" y="240" text-anchor="middle" fill="white" font-size="32">
    {{ data.title }}
  </text>
</svg>
Tips for background images:
- Use
preserveAspectRatio="xMidYMid slice"to cover the entire area - Consider e-ink limitations: high-contrast images work best
- Keep file sizes reasonable for fast rendering
Template Reusability
Byonk supports Tera’s template inheritance and includes for reusable components.
Directory Structure
Place reusable templates in special directories:
screens/
├── layouts/              # Base templates for {% extends %}
│   └── base.svg
├── components/           # Reusable snippets for {% include %}
│   ├── header.svg
│   ├── footer.svg
│   ├── hinting.svg
│   └── status_bar.svg
├── myscreen.lua
└── myscreen.svg
Template Inheritance (extends)
Create base layouts that define the overall structure with replaceable blocks:
screens/layouts/base.svg:
<svg xmlns="http://www.w3.org/2000/svg" viewBox="0 0 800 480" width="800" height="480">
  <rect width="100%" height="100%" fill="white"/>

  <!-- Header -->
  <rect x="0" y="0" width="100%" height="60" fill="black"/>
  <text x="20" y="40" fill="white" font-size="24" font-weight="bold">
    {% block title %}BYONK{% endblock %}
  </text>
  {% block header_extra %}{% endblock %}

  <!-- Content area -->
  <g transform="translate(0, 60)">
    {% block content %}{% endblock %}
  </g>

  {% block footer %}{% endblock %}
</svg>
screens/myscreen.svg:
{% extends "layouts/base.svg" %}

{% block title %}My Screen{% endblock %}

{% block content %}
<text x="400" y="200" text-anchor="middle" font-size="32">
  {{ data.message }}
</text>
{% endblock %}

{% block footer %}
<text x="400" y="460" text-anchor="middle" fill="#999" font-size="12">
  Updated: {{ data.updated_at }}
</text>
{% endblock %}
Key points:
- Use
{% extends "layouts/filename.svg" %}at the start of your template - Define blocks with
{% block name %}...{% endblock %} - Child templates override parent blocks
- Unoverridden blocks use the parent’s default content
Template Includes
Include reusable components in your templates:
screens/components/header.svg:
<rect x="0" y="0" width="100%" height="60" fill="black"/>
<text x="20" y="40" fill="white" font-size="24" font-weight="bold">
  {{ title | default(value="BYONK") }}
</text>
{% if updated_at %}
<text x="780" y="40" text-anchor="end" fill="#aaa" font-size="16">
  {{ updated_at }}
</text>
{% endif %}
screens/myscreen.svg:
<svg xmlns="http://www.w3.org/2000/svg" viewBox="0 0 800 480" width="800" height="480">
  <rect width="800" height="480" fill="white"/>

  <!-- Include the header component -->
  {% include "components/header.svg" %}

  <!-- Main content -->
  <g transform="translate(0, 60)">
    <text x="400" y="200" text-anchor="middle">{{ data.message }}</text>
  </g>

  <!-- Include the footer component -->
  {% include "components/footer.svg" %}
</svg>
Key points:
- Use
{% include "components/filename.svg" %}to insert a component - Included templates have access to all variables in the current context
- Components work well for headers, footers, status bars, and other repeated elements
Built-in Components
Byonk includes several ready-to-use components:
| Component | Description |
|---|---|
components/header.svg | Header bar with title and optional timestamp |
components/footer.svg | Footer with timestamp and optional text |
components/hinting.svg | Adaptive font hinting (mono for BW, smooth for greyscale) |
components/status_bar.svg | WiFi and battery indicators |
Combining Extends and Includes
You can use both in the same template:
{% extends "layouts/base.svg" %}

{% block title %}Dashboard{% endblock %}

{% block header_extra %}
{% include "components/status_bar.svg" %}
{% endblock %}

{% block content %}
<text x="400" y="200" text-anchor="middle">{{ data.message }}</text>
{% endblock %}
Next Steps
- Advanced Topics - HTML scraping, error handling
- API Reference - Complete Lua function reference
Advanced Topics
This guide covers advanced techniques for building robust Byonk screens.
Error Handling
Graceful HTTP Failures
Always wrap HTTP requests in pcall:
local function fetch_data(url)
  local ok, response = pcall(function()
    return http_get(url)
  end)

  if not ok then
    log_error("HTTP request failed: " .. tostring(response))
    return nil, response
  end

  return response, nil
end

-- Usage
local data, err = fetch_data("https://api.example.com/data")
if err then
  return {
    data = { error = "Could not fetch data" },
    refresh_rate = 60  -- Retry in 1 minute
  }
end
JSON Parsing Errors
local function safe_json_decode(str)
  local ok, result = pcall(function()
    return json_decode(str)
  end)

  if not ok then
    log_error("JSON parse error: " .. tostring(result))
    return nil
  end

  return result
end
Template Error Display
When errors occur, display them helpfully:
return {
  data = {
    has_error = true,
    error_message = "API returned invalid response",
    error_details = "Expected JSON, got HTML",
    retry_in = 60
  },
  refresh_rate = 60
}
{% if has_error %}
  <rect x="20" y="20" width="760" height="440" fill="white" stroke="red" stroke-width="4" rx="10"/>
  <text x="400" y="200" text-anchor="middle" font-size="24" fill="red">{{ error_message }}</text>
  <text x="400" y="240" text-anchor="middle" font-size="16" fill="#666">{{ error_details }}</text>
  <text x="400" y="300" text-anchor="middle" font-size="14" fill="#999">Retrying in {{ retry_in }} seconds...</text>
{% else %}
  <!-- Normal content -->
{% endif %}
HTML Scraping Techniques
Handling Missing Elements
local function safe_text(element)
  if element then
    return element:text()
  end
  return ""
end

local title = safe_text(doc:select_one("h1"))
Complex Table Parsing
local function parse_table(doc, selector)
  local rows = {}

  doc:select(selector .. " tr"):each(function(row)
    local cells = {}
    row:select("td, th"):each(function(cell)
      table.insert(cells, cell:text():match("^%s*(.-)%s*$"))  -- Trim whitespace
    end)

    if #cells > 0 then
      table.insert(rows, cells)
    end
  end)

  return rows
end

local data = parse_table(doc, "table.schedule")
-- Returns: { {"9:00", "Meeting"}, {"10:00", "Call"}, ... }
Following Links
local function get_detail_page(doc, selector)
  local link = doc:select_one(selector)
  if not link then return nil end

  local href = link:attr("href")
  if not href then return nil end

  -- Handle relative URLs
  if href:sub(1, 1) == "/" then
    href = "https://example.com" .. href
  end

  return http_get(href)
end
Handling Pagination
local all_items = {}
local page = 1

while true do
  local url = "https://example.com/list?page=" .. page
  local html = http_get(url)
  local doc = html_parse(html)

  local items_found = 0
  doc:select(".item"):each(function(el)
    table.insert(all_items, el:text())
    items_found = items_found + 1
  end)

  -- Stop if no items or we have enough
  if items_found == 0 or #all_items >= 50 then
    break
  end

  page = page + 1

  -- Safety limit
  if page > 10 then break end
end
Dynamic Refresh Rates
Time-Based Refresh
local now = time_now()
local hour = tonumber(time_format(now, "%H"))

local refresh_rate
if hour >= 6 and hour < 22 then
  -- Daytime: refresh frequently
  refresh_rate = 300
else
  -- Night: refresh less often
  refresh_rate = 3600
end
Event-Based Refresh
-- Refresh when the next event starts
local next_event_time = events[1].timestamp
local seconds_until = next_event_time - time_now()

-- Refresh 30 seconds after event starts (to show updated state)
local refresh_rate = math.max(30, seconds_until + 30)

-- Cap at reasonable maximum
refresh_rate = math.min(refresh_rate, 3600)
Adaptive Refresh
-- Refresh more often if data is stale
local last_update = data.updated_timestamp
local age = time_now() - last_update

if age > 600 then
  -- Data is stale, refresh soon
  refresh_rate = 60
else
  -- Data is fresh, normal refresh
  refresh_rate = 300
end
Data Transformation
Sorting
-- Sort by time
table.sort(items, function(a, b)
  return a.timestamp < b.timestamp
end)

-- Sort alphabetically
table.sort(items, function(a, b)
  return a.name < b.name
end)
Filtering
local active = {}
for _, item in ipairs(items) do
  if item.status == "active" then
    table.insert(active, item)
  end
end
Limiting
local limit = params.limit or 10
local limited = {}
for i = 1, math.min(#items, limit) do
  table.insert(limited, items[i])
end
Grouping
local by_category = {}
for _, item in ipairs(items) do
  local cat = item.category or "Other"
  if not by_category[cat] then
    by_category[cat] = {}
  end
  table.insert(by_category[cat], item)
end
Working with Dates
Relative Time
local function relative_time(timestamp)
  local diff = timestamp - time_now()

  if diff < 0 then
    return "past"
  elseif diff < 60 then
    return "now"
  elseif diff < 3600 then
    return math.floor(diff / 60) .. " min"
  elseif diff < 86400 then
    return math.floor(diff / 3600) .. " hr"
  else
    return math.floor(diff / 86400) .. " days"
  end
end
Date Comparison
local today_start = time_parse(time_format(time_now(), "%Y-%m-%d"), "%Y-%m-%d")
local today_end = today_start + 86400

local todays_events = {}
for _, event in ipairs(events) do
  if event.timestamp >= today_start and event.timestamp < today_end then
    table.insert(todays_events, event)
  end
end
Timezone Handling
-- time_format uses local timezone
-- For UTC, parse the offset from API responses

local function parse_iso_date(str)
  -- "2024-12-27T14:30:00+01:00"
  local y, m, d, h, min, s = str:match("(%d+)-(%d+)-(%d+)T(%d+):(%d+):(%d+)")
  if y then
    return time_parse(
      string.format("%s-%s-%s %s:%s:%s", y, m, d, h, min, s),
      "%Y-%m-%d %H:%M:%S"
    )
  end
  return nil
end
Performance Optimization
Minimize HTTP Requests
-- Bad: Multiple requests
local weather = json_decode(http_get("https://api.example.com/weather"))
local news = json_decode(http_get("https://api.example.com/news"))
local stocks = json_decode(http_get("https://api.example.com/stocks"))

-- Better: Combined endpoint if available
local dashboard = json_decode(http_get("https://api.example.com/dashboard"))
Early Exit
-- Check for errors early
if not params.api_key then
  return {
    data = { error = "Missing API key" },
    refresh_rate = 3600
  }
end
Limit Data Processing
-- Only process what you need
local limit = params.limit or 10
for i, item in ipairs(json.items) do
  if i > limit then break end
  -- Process item
end
Embedding Remote Images
You can fetch images via HTTP and embed them in SVG templates using http_get() and base64_encode(). The pattern is: fetch the image, base64-encode it, construct a data URI, and pass it to the template.
Lua Script
-- Fetch a remote image and embed it as a data URI
local ok, image_bytes = pcall(function()
  return http_get("https://example.com/photo.png", {
    cache_ttl = 3600  -- Cache for 1 hour to avoid re-fetching
  })
end)

if not ok then
  log_error("Failed to fetch image: " .. tostring(image_bytes))
  return {
    data = { error = "Could not load image" },
    refresh_rate = 60
  }
end

local image_src = "data:image/png;base64," .. base64_encode(image_bytes)

return {
  data = {
    image_src = image_src,
    title = "My Screen"
  },
  refresh_rate = 900
}
SVG Template
<image x="100" y="50" width="200" height="200" href="{{ data.image_src }}"/>
Tip: Use
cache_ttlon thehttp_getcall to avoid re-fetching the image on every device refresh. This is especially important for large images or rate-limited servers.
Google Photos Album Display
The built-in gphoto screen demonstrates fetching images from a shared Google Photos album using HTML scraping (no OAuth required).
Setup
- Open Google Photos and create or select an album
- Click Share → Get link to create a shared link
- Copy the URL (e.g.,
https://photos.app.goo.gl/ABC123...)
Configuration
# config.yaml
devices:
  "XX:XX:XX:XX:XX:XX":
    screen: gphoto
    params:
      album_url: "https://photos.app.goo.gl/YOUR_ALBUM_ID"
      show_status: true      # Show battery/signal overlay
      refresh_rate: 1800     # 30 minutes (default: 3600)
How It Works
The script scrapes the shared album HTML page to extract lh3.googleusercontent.com image URLs, then:
- Selects a random image from the album
- Appends size parameters (
=w{width}-h{height}-no) to request device-sized images - Fetches and base64-encodes the image for embedding in SVG
- Caches album HTML for 1 hour and images for 24 hours
This approach works because Google’s shared album pages embed image URLs directly in the HTML, even though the Photos API sharing features were deprecated in March 2025.
Testing Strategies
Test with Swagger UI
- Open
http://localhost:3000/swagger-ui - Use
/api/displaywith a test MAC address - Copy the image URL and open in browser
- Iterate on your script and template
Log Intermediate Values
log_info("Params: " .. json_encode(params))
log_info("Fetched " .. #items .. " items")
log_info("First item: " .. json_encode(items[1]))
Create Test Screens
# config.yaml
devices:
  "TE:ST:00:00:00:01":
    screen: myscreen
    params:
      test_mode: true
      mock_data: true
if params.test_mode then
  -- Use mock data for testing
  return {
    data = {
      items = {
        { name = "Test Item 1" },
        { name = "Test Item 2" }
      }
    },
    refresh_rate = 30
  }
end

-- Normal data fetching
Real-World Example: Room Booking
This example combines many advanced techniques:
-- floerli.lua - Room booking display

local room_name = params.room or "Rosa"
local base_url = params.url or "https://floerli-olten.ch"

log_info("Fetching bookings for room: " .. room_name)

-- Fetch and parse
local ok, html = pcall(function()
  return http_get(base_url .. "/index.cgi?rm=calendar")
end)

if not ok then
  log_error("Failed to fetch calendar: " .. tostring(html))
  return {
    data = {
      room = room_name,
      error = "Could not load calendar",
      bookings = {}
    },
    refresh_rate = 60
  }
end

local doc = html_parse(html)

-- Find room column index
local room_columns = {
  Flora = 1, Salon = 2, ["Küche"] = 3, Bernsteinzimmer = 4,
  Rosa = 5, Clara = 6, Cosy = 7, Sofia = 8
}
local col = room_columns[room_name] or 5

-- Parse table
local bookings = {}
local now = time_now()
local current_hour = tonumber(time_format(now, "%H"))

doc:select("table.calendar tr"):each(function(row)
  local time_cell = row:select_one("td:first-child")
  local room_cell = row:select_one("td:nth-child(" .. (col + 1) .. ")")

  if time_cell and room_cell then
    local time_str = time_cell:text()
    local hour = tonumber(time_str:match("^(%d+)"))

    if hour and hour >= current_hour then
      local booking_text = room_cell:text():match("^%s*(.-)%s*$")
      local is_free = (booking_text == "" or booking_text == "frei")

      table.insert(bookings, {
        time = time_str,
        title = is_free and nil or booking_text,
        is_free = is_free
      })
    end
  end
end)

-- Calculate refresh: at top of next hour
local minutes_until_next_hour = 60 - tonumber(time_format(now, "%M"))
local refresh_rate = math.max(60, minutes_until_next_hour * 60)

return {
  data = {
    room = room_name,
    bookings = bookings,
    current_booking = bookings[1],
    upcoming = { table.unpack(bookings, 2, 6) },
    updated_at = time_format(now, "%H:%M")
  },
  refresh_rate = refresh_rate
}
Next Steps
- HTTP API Reference - Full endpoint documentation
- Lua API Reference - Complete function reference
HTTP API Reference
Bring Your Own Server API for TRMNL e-ink devices
Version: 0.1.0
Overview
Byonk provides a REST API for TRMNL device communication. The API handles device registration, content delivery, and logging.
| Endpoint | Description |
|---|---|
GET /api/setup | Device registration |
GET /api/display | Get display content URL |
GET /api/image/{hash}.png | Get rendered PNG by content hash |
POST /api/log | Submit device logs |
GET /health | Health check |
Display
GET /api/display
Get display content for a device
Returns JSON with an image_url that the device should fetch separately. The firmware expects status=0 for success (not HTTP 200).
Parameters
| Name | In | Required | Description |
|---|---|---|---|
ID | header | Yes | Device MAC address |
Access-Token | header | Yes | API key from /api/setup |
Width | header | No | Display width in pixels (default: 800) |
Height | header | No | Display height in pixels (default: 480) |
Refresh-Rate | header | No | Current refresh rate in seconds |
Battery-Voltage | header | No | Battery voltage |
RSSI | header | No | WiFi signal strength |
FW-Version | header | No | Firmware version |
Model | header | No | Device model (‘og’ or ‘x’) |
Board | header | No | Board identifier (e.g., ‘trmnl_og_4clr’) |
Colors | header | No | Display palette as comma-separated hex RGB (e.g., ‘#000000,#FFFFFF,#FF0000,#FFFF00’). Defaults to 4-grey palette if absent. |
Responses
200: Display content available
{
  "filename": "string",
  "firmware_url": null,
  "image_url": null,
  "refresh_rate": 0,
  "reset_firmware": true,
  "special_function": null,
  "status": 0,
  "temperature_profile": null,
  "update_firmware": true
}
400: Missing required header
404: Device not found
GET /api/image/{hash}.png
Get rendered PNG image by content hash
Returns the actual PNG image data rendered from SVG with dithering applied.
The content hash is provided in the /api/display response and ensures clients can detect when content has changed.
Parameters
| Name | In | Required | Description |
|---|---|---|---|
hash | path | Yes | Content hash from /api/display response |
Responses
200: PNG image
404: Content not found (cache miss or invalid hash)
500: Rendering error
Logging
POST /api/log
Submit device logs
Devices send diagnostic logs when they encounter errors or issues.
Parameters
| Name | In | Required | Description |
|---|---|---|---|
ID | header | Yes | Device MAC address |
Access-Token | header | Yes | API key from /api/setup |
Request Body
{
  "logs": [null]
}
Responses
200: Logs received successfully
{
  "message": "string",
  "status": 0
}
Device
GET /api/setup
Register a new device or retrieve existing registration
The device sends its MAC address and receives an API key for future requests.
Parameters
| Name | In | Required | Description |
|---|---|---|---|
ID | header | Yes | Device MAC address (e.g., ‘AA:BB:CC:DD:EE:FF’) |
FW-Version | header | Yes | Firmware version (e.g., ‘1.7.1’) |
Model | header | Yes | Device model (‘og’ or ‘x’) |
Responses
200: Device registered successfully
{
  "api_key": null,
  "friendly_id": null,
  "image_url": null,
  "message": null,
  "status": 0
}
400: Missing required header
Lua API Reference
This page documents all functions available to Lua scripts in Byonk.
Global Variables
params
A table containing device-specific parameters from config.yaml.
local station = params.station  -- From config.yaml
local limit = params.limit or 10  -- With default
Type: table
device
A table containing device information (when available).
-- Check battery level
if device.battery_voltage and device.battery_voltage < 3.3 then
  log_warn("Low battery: " .. device.battery_voltage .. "V")
end

-- Check signal strength
if device.rssi and device.rssi < -80 then
  log_warn("Weak WiFi signal: " .. device.rssi .. " dBm")
end

-- Responsive layout based on device type
if device.width == 1872 then
  -- TRMNL X layout
else
  -- TRMNL OG layout
end
Fields:
| Field | Type | Description |
|---|---|---|
mac | string | Device MAC address (e.g., “AC:15:18:D4:7B:E2”) |
battery_voltage | number or nil | Battery voltage (e.g., 4.12) |
rssi | number or nil | WiFi signal strength in dBm (e.g., -65) |
model | string or nil | Device model (“og” or “x”) |
firmware_version | string or nil | Firmware version string |
width | number or nil | Display width in pixels (800 or 1872) |
height | number or nil | Display height in pixels (480 or 1404) |
board | string or nil | Board identifier (e.g., “trmnl_og_4clr”) |
colors | table or nil | Display palette as hex RGB strings (e.g., {“#000000”, “#FFFFFF”}) |
dither | table | Pre-script resolved dither tuning (see below) |
Type: table
Note: Device fields may be
nilif the device doesn’t report them. Always check before using.
device.dither
The device.dither sub-table contains the pre-script resolved dither tuning values (panel defaults merged with device config). Scripts can read these to make selective adjustments rather than setting everything blindly.
-- Read current tuning
local algo = device.dither.algorithm       -- "floyd-steinberg" (resolved algorithm)
local ec = device.dither.error_clamp       -- 0.08 (from panel/device config)
local ns = device.dither.noise_scale       -- 4.0
local cc = device.dither.chroma_clamp      -- nil (not set)
local st = device.dither.strength          -- 1.0 (default)

-- Selectively override: halve the error clamp, keep everything else
return {
  data = { ... },
  refresh_rate = 300,
  error_clamp = (device.dither.error_clamp or 0.1) * 0.5,
  -- noise_scale not returned -> keeps panel/device value
}
| Field | Type | Description |
|---|---|---|
algorithm | string or nil | Pre-script resolved dither algorithm |
error_clamp | number or nil | Error diffusion clamp (from device config / panel) |
noise_scale | number or nil | Blue noise jitter scale |
chroma_clamp | number or nil | Chromatic error clamp |
strength | number or nil | Error diffusion strength (0.0–2.0, default 1.0) |
layout
A table containing pre-computed responsive layout values. These values are automatically calculated based on the device dimensions, making it easy to create screens that work on both TRMNL OG (800×480) and TRMNL X (1872×1404).
-- Use pre-computed values directly
local margin = layout.margin        -- pixel-aligned margin
local center = layout.center_x      -- screen center X

-- Access display palette
local colors = layout.colors         -- {"#000000", "#555555", "#AAAAAA", "#FFFFFF"}
local count = layout.color_count     -- 4
local greys = layout.grey_count      -- 4 (colors where R=G=B)
Fields:
| Field | Type | Description | Default (OG) | Example (X) |
|---|---|---|---|---|
width | integer | Device width in pixels | 800 | 1872 |
height | integer | Device height in pixels | 480 | 1404 |
scale | number | Scale factor: min(width/800, height/480) | 1.0 | 2.34 |
center_x | integer | Horizontal center: floor(width/2) | 400 | 936 |
center_y | integer | Vertical center: floor(height/2) | 240 | 702 |
colors | table | Display palette as hex RGB strings | {“#000000”,“#555555”,“#AAAAAA”,“#FFFFFF”} | 16 grey values |
color_count | integer | Number of palette colors | 4 | 16 |
grey_count | integer | Number of grey levels (colors where R=G=B) | 4 | 16 |
margin | integer | Standard margin: floor(20 * scale) | 20 | 46 |
margin_sm | integer | Small margin: floor(10 * scale) | 10 | 23 |
margin_lg | integer | Large margin: floor(40 * scale) | 40 | 93 |
Type: table
Note: All margin values are pre-floored for pixel-aligned positioning.
fonts
A table of all available font families and their faces. Keyed by family name, each value is an array of face records.
-- List all font families
for family, faces in pairs(fonts) do
  print(family)  -- "X11Helv", "TerminusTTF", "Outfit", ...
end

-- Query a specific family
for _, face in ipairs(fonts["X11Helv"]) do
  print(face.style)           -- "Normal", "Italic", "Oblique"
  print(face.weight)          -- 400 (number)
  print(face.stretch)         -- "Normal", "Condensed", ...
  print(face.monospaced)      -- true/false
  print(face.post_script_name)-- "X11Helv"
  -- Bitmap strike sizes (sorted ppem values), empty for outline-only fonts
  for _, ppem in ipairs(face.bitmap_strikes) do
    print(ppem)               -- 8, 10, 11, 12, ...
  end
end
Face fields:
| Field | Type | Description |
|---|---|---|
style | string | "Normal", "Italic", or "Oblique" |
weight | number | CSS-style weight (100–900, 400 = normal, 700 = bold) |
stretch | string | "Normal", "Condensed", "Expanded", etc. |
monospaced | boolean | Whether the face is monospaced |
post_script_name | string | PostScript name of the face |
bitmap_strikes | table | Sorted array of available bitmap ppem sizes (empty if none) |
Type: table
Layout Helper Functions
These functions help scale values appropriately for different device resolutions.
scale_font(value)
Scales a font size value by the layout scale factor. Returns a float to preserve precision for font rendering.
local title_size = scale_font(48)    -- 48.0 on OG, 112.32 on X
local body_size = scale_font(24)     -- 24.0 on OG, 56.16 on X
Parameters:
| Name | Type | Description |
|---|---|---|
value | number | Base font size (designed for 800×480) |
Returns: number - Scaled font size (float)
scale_pixel(value)
Scales a pixel value by the layout scale factor and floors the result for pixel-aligned positioning.
local header_y = scale_pixel(70)     -- 70 on OG, 163 on X
local icon_size = scale_pixel(32)    -- 32 on OG, 74 on X
Parameters:
| Name | Type | Description |
|---|---|---|
value | number | Base pixel value (designed for 800×480) |
Returns: integer - Scaled and floored pixel value
greys(levels)
Generates a grey palette with the specified number of levels. Useful for creating gradients or color swatches that match the device’s grey level capability.
-- Generate palette matching device capability
local palette = greys(layout.grey_levels)

for i, entry in ipairs(palette) do
  print(entry.value)       -- 0-255 grey value
  print(entry.color)       -- "#000000" to "#ffffff"
  print(entry.text_color)  -- "#ffffff" for dark, "#000000" for light
end
Parameters:
| Name | Type | Description |
|---|---|---|
levels | integer | Number of grey levels (typically 4 or 16) |
Returns: table - Array of palette entries
Palette entry fields:
| Field | Type | Description |
|---|---|---|
value | integer | Grey value from 0 (black) to 255 (white) |
color | string | Hex color string (e.g., “#808080”) |
text_color | string | Contrasting text color (“#ffffff” or “#000000”) |
Example with 4 levels:
local palette = greys(4)
-- palette[1] = {value=0,   color="#000000", text_color="#ffffff"}
-- palette[2] = {value=85,  color="#555555", text_color="#ffffff"}
-- palette[3] = {value=170, color="#aaaaaa", text_color="#000000"}
-- palette[4] = {value=255, color="#ffffff", text_color="#000000"}
Example: Responsive Screen
Here’s how to create a screen that works on both TRMNL OG and TRMNL X:
-- Before (manual boilerplate):
local width = device and device.width or 800
local height = device and device.height or 480
local scale = math.min(width / 800, height / 480)
local font_size = math.floor(48 * scale)  -- Wrong: shouldn't floor fonts
local header_y = math.floor(70 * scale)   -- Correct: pixel-aligned

-- After (using helpers):
local font_size = scale_font(48)     -- Preserves precision for fonts
local header_y = scale_pixel(70)     -- Pixel-aligned position
local margin = layout.margin         -- Pre-computed pixel margin
local colors = layout.colors                 -- Display palette colors
HTTP Functions
Byonk provides three HTTP functions: http_request (full control), http_get (GET shorthand), and http_post (POST shorthand).
http_request(url, options?)
Core HTTP function with full control over the request method and options.
-- GET request (default)
local response = http_request("https://api.example.com/data")

-- POST with JSON body
local response = http_request("https://api.example.com/users", {
  method = "POST",
  json = { name = "Alice", email = "alice@example.com" }
})

-- PUT request with headers
local response = http_request("https://api.example.com/users/123", {
  method = "PUT",
  headers = { ["Authorization"] = "Bearer " .. params.token },
  json = { name = "Alice Updated" }
})

-- DELETE request
local response = http_request("https://api.example.com/users/123", {
  method = "DELETE",
  headers = { ["Authorization"] = "Bearer " .. params.token }
})
Parameters:
| Name | Type | Description |
|---|---|---|
url | string | The URL to fetch |
options | table (optional) | Request options (see below) |
Options:
| Name | Type | Default | Description |
|---|---|---|---|
method | string | “GET” | HTTP method: “GET”, “POST”, “PUT”, “DELETE”, “PATCH”, “HEAD” |
params | table | none | Query parameters (automatically URL-encoded) |
headers | table | none | Key-value pairs of HTTP headers |
body | string | none | Request body as string |
json | table | none | Request body as JSON (auto-serializes, sets Content-Type) |
basic_auth | table | none | Basic auth: { username = "...", password = "..." } |
timeout | number | 30 | Request timeout in seconds |
follow_redirects | boolean | true | Whether to follow HTTP redirects |
max_redirects | number | 10 | Maximum number of redirects to follow |
danger_accept_invalid_certs | boolean | false | Accept self-signed/expired certificates (insecure!) |
ca_cert | string | none | Path to CA certificate PEM file for server verification |
client_cert | string | none | Path to client certificate PEM file for mTLS |
client_key | string | none | Path to client private key PEM file for mTLS |
cache_ttl | number | none | Cache response for N seconds (LRU cache, max 100 entries) |
Returns: string - The response body
Throws: Error if the request fails
JSON option details:
The json option supports complex nested structures. Tables with sequential integer keys (starting at 1) become JSON arrays; tables with string keys become JSON objects. Use bracket syntax for keys with spaces or special characters:
http_post("https://api.example.com/data", {
  json = {
    -- Nested objects and arrays
    users = {
      { name = "Alice", tags = {"admin", "user"} },
      { name = "Bob", roles = { level = 2, active = true } }
    },
    -- Keys with spaces or special characters
    ["Content-Type"] = "application/json",
    ["my key with spaces"] = "works fine",
    -- Mixed types
    count = 42,
    enabled = true,
    optional = nil  -- becomes JSON null
  }
})
http_get(url, options?)
Convenience wrapper for GET requests. Same as http_request with method = "GET".
-- Simple usage
local response = http_get("https://api.example.com/data")

-- With query parameters (auto URL-encoded)
local response = http_get("https://api.example.com/search", {
  params = {
    query = "hello world",  -- becomes ?query=hello%20world&limit=10
    limit = 10
  }
})

-- With authentication header
local response = http_get("https://api.example.com/data", {
  headers = { ["Authorization"] = "Bearer " .. params.api_token }
})

-- With basic auth
local response = http_get("https://api.example.com/data", {
  basic_auth = { username = params.user, password = params.pass }
})

-- Accept self-signed certificates (for internal APIs)
local response = http_get("https://internal.example.com/data", {
  danger_accept_invalid_certs = true
})

-- Use custom CA certificate for server verification
local response = http_get("https://internal.example.com/data", {
  ca_cert = "/path/to/ca.pem"
})

-- Mutual TLS (mTLS) with client certificate
local response = http_get("https://secure-api.example.com/data", {
  ca_cert = "/path/to/ca.pem",
  client_cert = "/path/to/client.pem",
  client_key = "/path/to/client-key.pem"
})

-- Cache response for 5 minutes (300 seconds)
-- Useful for APIs with rate limits or data that doesn't change frequently
local response = http_get("https://api.weather.com/current", {
  params = { city = "Zurich" },
  cache_ttl = 300  -- Cache for 5 minutes
})
Response Caching:
The cache_ttl option enables response caching with LRU (Least Recently Used) eviction:
- Responses are cached in memory for the specified number of seconds
- Cache key is based on URL, method, params, headers, and body
- Maximum 100 cached entries; oldest entries are evicted when full
- Cache is shared across all script executions
- Useful for reducing API calls to rate-limited services or slow APIs
-- First call fetches from API, subsequent calls within 60s use cache
local data = http_get("https://api.example.com/data", { cache_ttl = 60 })
http_post(url, options?)
Convenience wrapper for POST requests. Same as http_request with method = "POST".
-- POST with JSON body
local response = http_post("https://api.example.com/data", {
  json = { key = "value", count = 42 }
})

-- POST with form-like body
local response = http_post("https://api.example.com/data", {
  headers = { ["Content-Type"] = "application/x-www-form-urlencoded" },
  body = "key=value&count=42"
})

-- POST with authentication
local response = http_post("https://api.example.com/data", {
  headers = { ["Authorization"] = "Bearer " .. params.token },
  json = { action = "update" }
})
Example with error handling:
local ok, response = pcall(function()
  return http_get("https://api.example.com/data", {
    headers = { ["Authorization"] = "Bearer " .. params.token }
  })
end)

if not ok then
  log_error("Request failed: " .. tostring(response))
end
JSON Functions
json_decode(str)
Parses a JSON string into a Lua table.
local data = json_decode('{"name": "Alice", "age": 30}')
print(data.name)  -- "Alice"
Parameters:
| Name | Type | Description |
|---|---|---|
str | string | JSON string to parse |
Returns: table - The parsed JSON as a Lua table
Notes:
- JSON arrays become 1-indexed Lua tables
- JSON
nullbecomes Luanil
json_encode(table)
Converts a Lua table to a JSON string.
local json = json_encode({name = "Bob", items = {1, 2, 3}})
-- '{"name":"Bob","items":[1,2,3]}'
Parameters:
| Name | Type | Description |
|---|---|---|
table | table | Lua table to encode |
Returns: string - JSON representation
Notes:
- Tables with sequential integer keys become arrays
- Tables with string keys become objects
HTML Parsing Functions
html_parse(html)
Parses an HTML string and returns a document object.
local doc = html_parse("<html><body><h1>Hello</h1></body></html>")
Parameters:
| Name | Type | Description |
|---|---|---|
html | string | HTML string to parse |
Returns: Document - Parsed document object
Document Methods
doc:select(selector)
Queries elements using a CSS selector.
local links = doc:select("a.nav-link")
local items = doc:select("ul > li")
Parameters:
| Name | Type | Description |
|---|---|---|
selector | string | CSS selector |
Returns: Elements - Collection of matching elements
Supported selectors:
- Tag:
div,a,span - Class:
.classname - ID:
#idname - Attribute:
[href],[data-id="123"] - Combinators:
div > p,ul li,h1 + p - Pseudo-classes:
:first-child,:nth-child(2)
doc:select_one(selector)
Returns only the first matching element.
local title = doc:select_one("h1")
if title then
  print(title:text())
end
Parameters:
| Name | Type | Description |
|---|---|---|
selector | string | CSS selector |
Returns: Element or nil - First matching element
Elements Methods
elements:each(fn)
Iterates over all elements in the collection.
doc:select("li"):each(function(el)
  print(el:text())
end)
Parameters:
| Name | Type | Description |
|---|---|---|
fn | function | Callback receiving each element |
Element Methods
element:text()
Gets the inner text content.
local heading = doc:select_one("h1")
local text = heading:text()  -- "Welcome"
Returns: string - Text content
element:attr(name)
Gets an attribute value.
local link = doc:select_one("a")
local href = link:attr("href")  -- "https://..."
local class = link:attr("class")  -- "nav-link" or nil
Parameters:
| Name | Type | Description |
|---|---|---|
name | string | Attribute name |
Returns: string or nil - Attribute value
element:html()
Gets the inner HTML.
local div = doc:select_one("div.content")
local inner = div:html()  -- "<p>Paragraph</p><p>Another</p>"
Returns: string - Inner HTML
element:select(selector)
Queries descendants of this element.
local table = doc:select_one("table.data")
local rows = table:select("tr")
Parameters:
| Name | Type | Description |
|---|---|---|
selector | string | CSS selector |
Returns: Elements - Matching descendants
element:select_one(selector)
Returns first matching descendant.
local row = doc:select_one("tr")
local first_cell = row:select_one("td")
Parameters:
| Name | Type | Description |
|---|---|---|
selector | string | CSS selector |
Returns: Element or nil
Time Functions
time_now()
Returns the current Unix timestamp.
local now = time_now() -- e.g., 1703672400
Returns: number - Unix timestamp (seconds since 1970)
time_format(timestamp, format)
Formats a timestamp into a string using the server’s local timezone.
local now = time_now()
time_format(now, "%H:%M")      -- "14:32"
time_format(now, "%Y-%m-%d")   -- "2024-12-27"
time_format(now, "%A, %B %d")  -- "Friday, December 27"
Parameters:
| Name | Type | Description |
|---|---|---|
timestamp | number | Unix timestamp |
format | string | strftime format string |
Returns: string - Formatted date/time
Format codes:
| Code | Description | Example |
|---|---|---|
%Y | Year (4 digit) | 2024 |
%y | Year (2 digit) | 24 |
%m | Month (01-12) | 12 |
%d | Day (01-31) | 27 |
%H | Hour 24h (00-23) | 14 |
%I | Hour 12h (01-12) | 02 |
%M | Minute (00-59) | 32 |
%S | Second (00-59) | 05 |
%A | Weekday name | Friday |
%a | Weekday short | Fri |
%B | Month name | December |
%b | Month short | Dec |
%p | AM/PM | PM |
%Z | Timezone | CET |
%% | Literal % | % |
time_parse(str, format)
Parses a date string into a Unix timestamp.
local ts = time_parse("2024-12-27 14:30", "%Y-%m-%d %H:%M")
Parameters:
| Name | Type | Description |
|---|---|---|
str | string | Date string to parse |
format | string | strftime format string |
Returns: number - Unix timestamp
Note: Uses local timezone for interpretation.
Asset Functions
read_asset(path)
Reads a file from the current screen’s asset directory.
-- From hello.lua, reads screens/hello/logo.png
local logo_bytes = read_asset("logo.png")
Parameters:
| Name | Type | Description |
|---|---|---|
path | string | Relative path within the screen’s asset directory |
Returns: string - Binary file contents
Throws: Error if the file cannot be read
Asset directory convention:
screens/
├── hello.lua         # Script at top level
├── hello.svg         # Template at top level
└── hello/            # Assets for "hello" screen
    ├── logo.png
    └── icon.svg
When read_asset("logo.png") is called from hello.lua, it reads screens/hello/logo.png.
Example: Embedding an image in data:
local logo = read_asset("logo.png")
local logo_b64 = base64_encode(logo)

return {
    data = {
        logo_src = "data:image/png;base64," .. logo_b64
    },
    refresh_rate = 3600
}
base64_encode(data)
Encodes binary data (string) to a base64 string.
local encoded = base64_encode(raw_bytes)
Parameters:
| Name | Type | Description |
|---|---|---|
data | string | Binary data to encode |
Returns: string - Base64-encoded string
Example: Creating a data URI from a local asset:
local image_data = read_asset("icon.png")
local data_uri = "data:image/png;base64," .. base64_encode(image_data)
Example: Embedding a remote image:
local image_bytes = http_get("https://example.com/photo.png", { cache_ttl = 3600 })
local image_src = "data:image/png;base64," .. base64_encode(image_bytes)
See Embedding Remote Images for a complete example with error handling.
URL Encoding Functions
url_encode(str)
URL-encodes a string for safe use in URLs (query parameters, path segments).
local encoded = url_encode("hello world")  -- "hello%20world"
local station = url_encode("Zürich, HB")   -- "Z%C3%BCrich%2C%20HB"
Parameters:
| Name | Type | Description |
|---|---|---|
str | string | String to URL-encode |
Returns: string - URL-encoded string
Example: Building a URL with special characters:
local station = params.station -- "Zürich, HB"
local url = "https://api.example.com/departures?station=" .. url_encode(station)
-- Result: https://api.example.com/departures?station=Z%C3%BCrich%2C%20HB
Note: When using the params option in http_get/http_request, parameters are automatically URL-encoded. Use url_encode only when building URLs manually.
url_decode(str)
Decodes a URL-encoded string.
local decoded = url_decode("hello%20world") -- "hello world"
local station = url_decode("Z%C3%BCrich%2C%20HB") -- "Zürich, HB"
Parameters:
| Name | Type | Description |
|---|---|---|
str | string | URL-encoded string to decode |
Returns: string - Decoded string
Throws: Error if the string contains invalid UTF-8 after decoding
QR Code Functions
qr_svg(data, options)
Generates a pixel-aligned QR code as an SVG fragment for embedding in templates. Uses anchor-based positioning with edge margins, so you don’t need to calculate the QR code size.
-- Position QR code in bottom-right corner with 10px margins
local qr = qr_svg("https://example.com", {
anchor = "bottom-right",
right = 10,
bottom = 10,
module_size = 4
})
-- Centered QR code
local qr = qr_svg("https://example.com", {
anchor = "center",
module_size = 5
})
-- Top-left with custom margins
local qr = qr_svg("https://example.com", {
anchor = "top-left",
left = 20,
top = 20,
module_size = 4,
ec_level = "H"
})
Parameters:
| Name | Type | Description |
|---|---|---|
data | string | Content to encode (URL, text, etc.) |
options | table | Positioning and rendering options (see below) |
Options:
| Name | Type | Default | Description |
|---|---|---|---|
anchor | string | “top-left” | Which corner to anchor: “top-left”, “top-right”, “bottom-left”, “bottom-right”, “center” |
top | integer | 0 | Margin from top edge in pixels (for top-* anchors) |
left | integer | 0 | Margin from left edge in pixels (for *-left anchors) |
right | integer | 0 | Margin from right edge in pixels (for *-right anchors) |
bottom | integer | 0 | Margin from bottom edge in pixels (for bottom-* anchors) |
module_size | integer | 4 | Size of each QR module in pixels (recommended: 3-6) |
ec_level | string | “M” | Error correction level: “L” (7%), “M” (15%), “Q” (25%), “H” (30%) |
quiet_zone | integer | 4 | QR quiet zone in modules |
Anchor and margin combinations:
| Anchor | Relevant margins |
|---|---|
top-left | top, left |
top-right | top, right |
bottom-left | bottom, left |
bottom-right | bottom, right |
center | (centered, margins ignored) |
Returns: string - SVG fragment (<g> element with <rect> elements)
Throws: Error if QR code generation fails or if an invalid anchor is specified.
Example in template:
-- hello.lua
return {
data = {
-- QR code anchored to bottom-right with 10px margin
qr_code = qr_svg("https://www.youtube.com/watch?v=dQw4w9WgXcQ", {
anchor = "bottom-right",
right = 10,
bottom = 10,
module_size = 4
})
},
refresh_rate = 3600
}
<!-- hello.svg -->
{{ data.qr_code | safe }}
Notes:
- Screen dimensions are automatically read from
device.widthanddevice.height(defaults to 800x480) - Use integer values for margins and
module_sizefor crisp rendering on e-ink displays - Module size 3-6 pixels works well for 800x480 displays
- Higher error correction allows the QR code to remain scannable even if partially obscured
Logging Functions
log_info(message)
Logs an informational message.
log_info("Processing request for: " .. station)
Parameters:
| Name | Type | Description |
|---|---|---|
message | string | Message to log |
Server output:
INFO script=true: Processing request for: Olten
log_warn(message)
Logs a warning message.
log_warn("API response was empty")
Parameters:
| Name | Type | Description |
|---|---|---|
message | string | Message to log |
log_error(message)
Logs an error message.
log_error("Failed to parse response: " .. err)
Parameters:
| Name | Type | Description |
|---|---|---|
message | string | Message to log |
Script Return Value
Every script must return a table with this structure:
return {
data = {
-- Any data structure
-- Available in template as data.*
title = "My Title",
items = { ... }
},
refresh_rate = 300, -- Seconds until next refresh
skip_update = false, -- Optional: skip rendering, just check back later
colors = { "#000000", "#FFFFFF", "#FF0000" }, -- Optional: override display palette
dither = "atkinson", -- Optional: dither algorithm
preserve_exact = true, -- Optional: preserve exact palette matches (default: true)
error_clamp = 0.08, -- Optional: error diffusion clamp
noise_scale = 0.6, -- Optional: blue noise jitter scale
chroma_clamp = 2.0, -- Optional: chromatic error clamp
strength = 0.8, -- Optional: error diffusion strength (default 1.0)
}
data
| Field | Type | Description |
|---|---|---|
data | table | Data passed to the Tera template under data.* namespace |
The data table can contain any Lua values:
- Strings, numbers, booleans
- Nested tables (become objects)
- Arrays (1-indexed tables with sequential keys)
In templates, access this data with the data. prefix:
<text>{{ data.title }}</text>
{% for item in data.items %}...{% endfor %}
refresh_rate
| Field | Type | Description |
|---|---|---|
refresh_rate | number | Seconds until device should refresh |
Guidelines:
- 30-60: Real-time data (transit, stocks)
- 300-900: Regular updates (weather, calendar)
- 3600+: Static or slow-changing content
If refresh_rate is 0 or omitted, the screen’s default_refresh from config is used.
colors
| Field | Type | Description |
|---|---|---|
colors | table or nil | Optional array of hex RGB color strings to override the display palette |
When colors is returned by a script, it takes the highest priority in the color palette chain:
- Script
colors(strongest) — returned in the script result table - Device config
colors— set per-device inconfig.yaml - Firmware
Colorsheader — sent by device hardware - System default —
#000000,#555555,#AAAAAA,#FFFFFF
-- Force a 3-color palette for this screen
return {
data = { ... },
refresh_rate = 300,
colors = { "#000000", "#FFFFFF", "#FF0000" }
}
dither
| Field | Type | Description |
|---|---|---|
dither | string or nil | Optional dithering algorithm |
Controls the dithering algorithm used when converting SVG to e-ink PNG. Available values:
| Value | Algorithm | Description |
|---|---|---|
"atkinson" (default) | Atkinson | Error diffusion (75% propagation) |
"atkinson-hybrid" | Atkinson Hybrid | 100% achromatic / 75% chromatic propagation |
"floyd-steinberg" | Floyd-Steinberg | General-purpose error diffusion |
"jarvis-judice-ninke" | JJN | Wide kernel, least oscillation |
"sierra" | Sierra | 10-neighbor error diffusion |
"sierra-two-row" | Sierra Two-Row | 7-neighbor error diffusion |
"sierra-lite" | Sierra Lite | Fastest error diffusion |
"stucki" | Stucki | Wide 12-neighbor kernel similar to JJN |
"burkes" | Burkes | 7-neighbor, good balance of speed and quality |
The dither mode follows a priority chain:
- Dev UI override (strongest) — set in dev mode
- Script
dither— returned in the script result table - Device config
dither— set per-device inconfig.yaml - Default —
"atkinson"
-- Use Floyd-Steinberg dithering for a screen that displays images
return {
data = { image_url = "..." },
refresh_rate = 3600,
dither = "floyd-steinberg"
}
preserve_exact
| Field | Type | Description |
|---|---|---|
preserve_exact | boolean or nil | Whether to preserve exact palette color matches (default: true) |
When true (default), pixels that exactly match a palette color are kept as-is without dithering. This preserves sharp edges for text, lines, and borders. Set to false to force all pixels through the dithering pipeline.
return {
data = { ... },
refresh_rate = 300,
preserve_exact = false -- force all pixels through dithering
}
error_clamp, noise_scale, chroma_clamp, strength
| Field | Type | Description |
|---|---|---|
error_clamp | number or nil | Limits error diffusion amplitude (e.g. 0.08) |
noise_scale | number or nil | Blue noise jitter scale (e.g. 0.6) |
chroma_clamp | number or nil | Limits chromatic error propagation (e.g. 2.0) |
strength | number or nil | Error diffusion strength multiplier (0.0 = no diffusion, 1.0 = standard, default) |
Fine-tune dithering behavior per-script. These override device config and panel default values but are overridden by dev UI settings.
Priority chain: dev UI > script return > device config > panel dither defaults > algorithm defaults.
Use dev mode to interactively find good values, then set them here or in the panel dither defaults for production use.
-- Tuned values for a photo screen on a 4-color panel
return {
data = { ... },
refresh_rate = 3600,
dither = "floyd-steinberg",
error_clamp = 0.08,
noise_scale = 0.5,
strength = 0.8
}
skip_update
| Field | Type | Description |
|---|---|---|
skip_update | boolean | If true, don’t update the display - just tell device to check back later |
When skip_update is true:
- No new image is rendered
- The device keeps its current display content
- The device will check back after
refresh_rateseconds
This is useful when your data source hasn’t changed:
-- Check if data has changed since last update
local cached_hash = get_data_hash()
local current_data = fetch_data()
local new_hash = compute_hash(current_data)
if cached_hash == new_hash then
-- No changes - tell device to check back in 5 minutes
return {
data = {},
refresh_rate = 300,
skip_update = true
}
end
-- Data changed - render new content
return {
data = current_data,
refresh_rate = 300,
skip_update = false -- or just omit it
}
Note: When
skip_updateis true, thedatatable is ignored since no rendering occurs.
Standard Lua Functions
Byonk uses Lua 5.4. Standard library functions available include:
String
string.format,string.sub,string.findstring.match,string.gmatch,string.gsubstring.upper,string.lower,string.len
Table
table.insert,table.removetable.sort,table.concatipairs,pairs
Math
math.floor,math.ceil,math.absmath.min,math.maxmath.random
Other
tonumber,tostring,typepcall(for error handling)
Not available: File I/O, OS functions, network (except http_get)