Dev Mode
Byonk includes a development mode that provides a web-based device simulator with live reload capabilities, making it easier to develop and test screens.
Starting Dev Mode
# Start with dev mode enabled
byonk dev

# With external screens directory for live reload
SCREENS_DIR=./screens byonk dev
Once started, open your browser to http://localhost:3000/dev to access the device simulator.
Features
Device Simulator
The simulator displays your rendered screens in a visual frame resembling a TRMNL device. You can:
- Select a screen from the dropdown (populated from config.yaml and auto-discovered screens)
- Select a device to auto-load its configured screen, parameters, panel, and dither settings
- Simulate device context: battery voltage, WiFi RSSI, and time override
- View the rendered PNG exactly as it would appear on the device
- Pixel inspector: hover over the image to see a magnified view
Live Reload
When SCREENS_DIR is set to an external directory, the dev mode watches for changes to .lua and .svg files. When you save a file:
- The file watcher detects the change
- An event is sent to connected browsers via Server-Sent Events (SSE)
- The screen automatically re-renders with the latest code
Custom Parameters
The dev UI includes a JSON editor for passing custom parameters to your Lua scripts. These are available in your script via the params table.
Error Display
Errors are displayed in a console below the device preview, including Lua syntax/runtime errors, template errors, and render failures.
Display Calibration
Dev mode provides tools for calibrating dithering to match your physical display. Changes made in the dev UI are synced live to the actual device — what you tune is what the device shows.
Dither Algorithm Selection
The dither dropdown lets you try all 9 algorithms on your content:
atkinson(default) — Atkinson error diffusion (75% propagation)atkinson-hybrid— Atkinson with hybrid propagation (100% achromatic / 75% chromatic)floyd-steinberg— Floyd-Steinberg with blue noise jitterjarvis-judice-ninke— wide 12-neighbor kernelsierra,sierra-two-row,sierra-lite— Sierra familystucki— wide 12-neighbor kernel similar to JJNburkes— 7-neighbor kernel, good balance of speed and quality
Dither Tuning Controls
The Render Options panel exposes three tuning parameters:
| Control | Effect |
|---|---|
| Error clamp | Limits how much error is diffused. Lower values (0.05–0.1) reduce oscillation in smooth gradients. |
| Noise scale | Controls blue noise jitter strength. Higher values break “worm” artifacts more aggressively. |
| Chroma clamp | Limits chromatic error propagation. Prevents color bleeding on chromatic palettes. |
Color Calibration
Click any actual-color swatch to open the HSL adjustment popup. Adjust hue, saturation, and lightness with live preview to match what your panel really displays. The adjusted colors_actual string can be copied to config.yaml.
Live Device Sync
When you select a device entry and adjust dither algorithm, tuning parameters, or measured colors, changes are synced to the production /api/display handler. The physical device picks up the new settings on its next refresh.
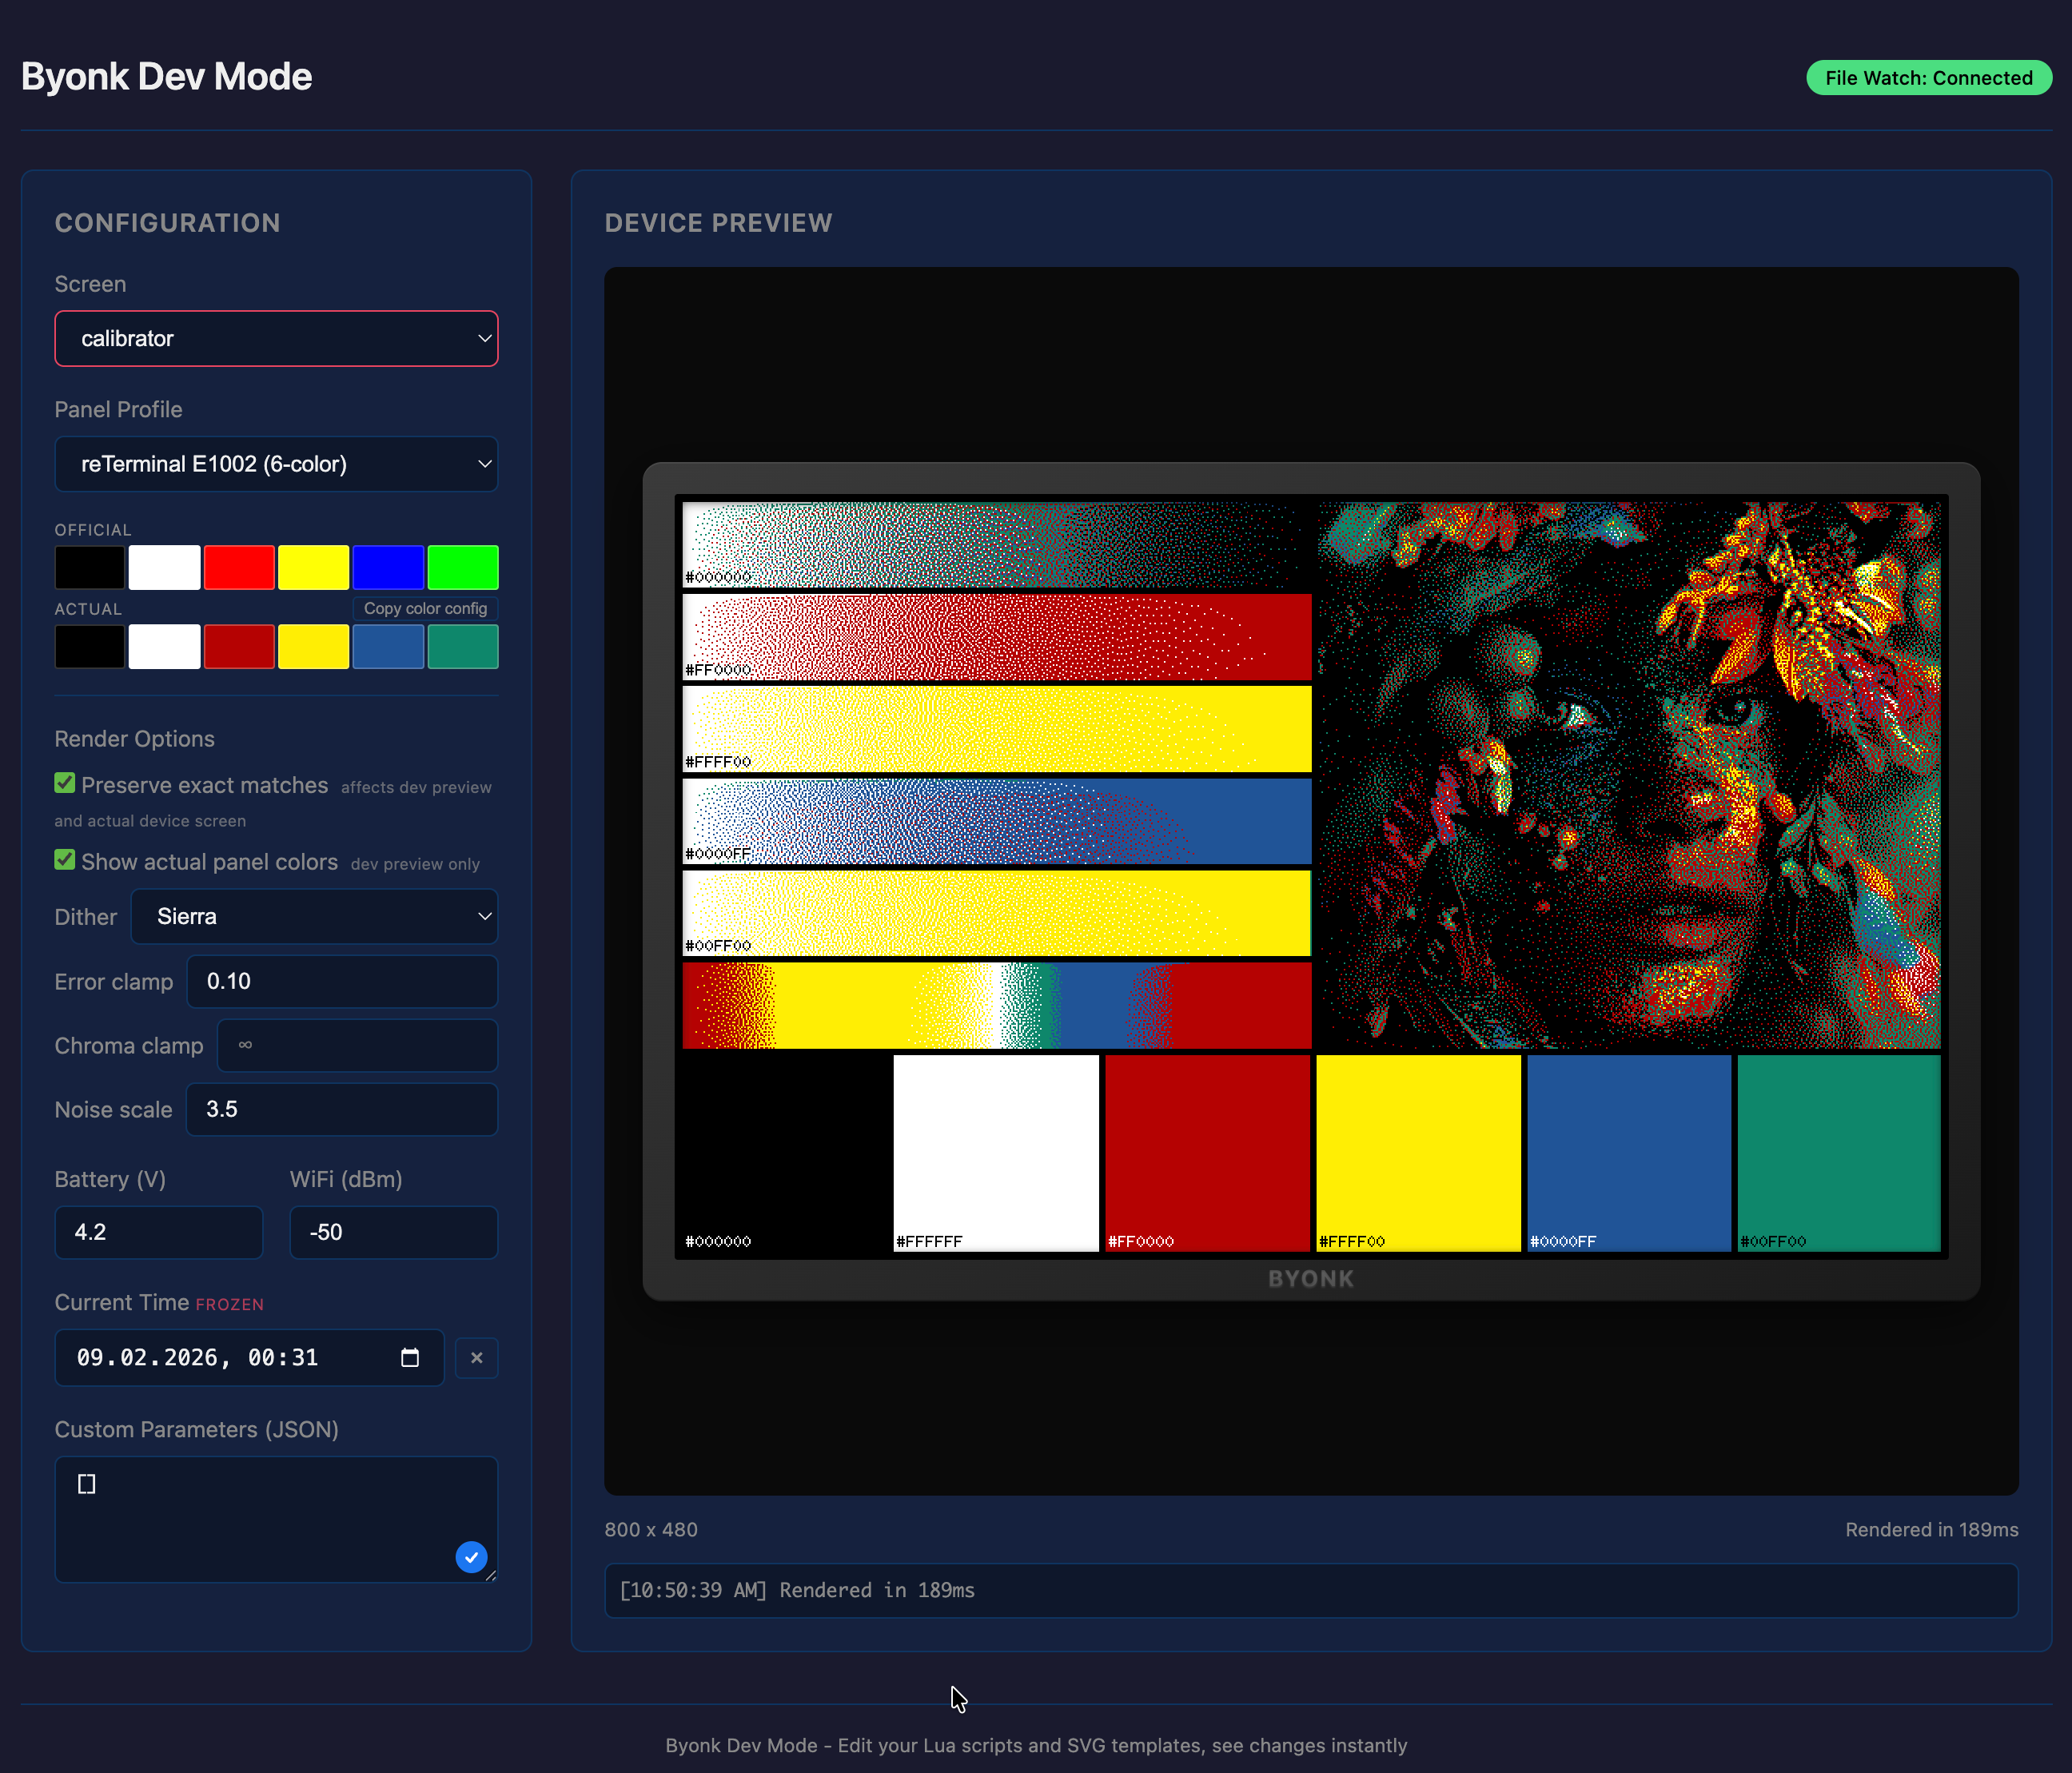
Calibrator Screen
Byonk ships a built-in calibrator screen designed specifically for display calibration. Assign it to your device temporarily while tuning:
devices:
  "ABCDE-FGHJK":
    screen: calibrator
    panel: my_panel
    dither: atkinson
The calibrator shows everything you need to evaluate dithering quality:
- White-to-color gradients for each palette color — reveals error diffusion artifacts, oscillation, and color bleeding
- Full hue sweep at 100% saturation — shows how the ditherer maps arbitrary colors to your limited palette
- Test photo — real-world image to judge overall photo reproduction
- Solid color patches with hex labels — compare what the panel actually displays against the expected color values
Use the calibrator on your physical device while adjusting tuning in dev mode — the live sync means every change you make is immediately visible on the display.
Calibration Workflow
- Assign the
calibratorscreen to your device inconfig.yaml - Select your device in dev mode — this loads its screen, panel, and dither settings
- Choose a dither algorithm that works well for your content type
- Adjust tuning parameters (error_clamp, noise_scale, chroma_clamp, strength) until the preview looks good
- Calibrate measured colors by clicking actual-color swatches and adjusting HSL to match the solid patches on the physical display
- Verify on device — changes sync automatically; wait for the next device refresh
- Commit to config — copy the values to
config.yamland switch back to your normal screen:
panels:
  my_panel:
    name: "My Panel"
    colors: "#000000,#FFFFFF,#FF0000,#FFFF00"
    colors_actual: "#303030,#D0D0C8,#C04040,#D0D020"  # from dev mode calibration

devices:
  "ABCDE-FGHJK":
    screen: gphoto
    panel: my_panel
    dither: floyd-steinberg
    error_clamp: 0.08   # from dev mode tuning
    noise_scale: 0.5    # from dev mode tuning
Tuning values can also be set per-script in the Lua return table — see Lua API.
Configuration
Dev mode uses the same environment variables as the normal server:
| Variable | Description | Default |
|---|---|---|
BIND_ADDR | Server bind address | 0.0.0.0:3000 |
SCREENS_DIR | External screens directory (enables live reload) | (embedded) |
FONTS_DIR | External fonts directory | (embedded) |
CONFIG_FILE | External config file | (embedded) |
Example Workflow
-
Extract embedded assets to work with:
byonk init --all -
Start dev mode with external screens:
SCREENS_DIR=./screens CONFIG_FILE=./config.yaml byonk dev -
Open
http://localhost:3000/devin your browser -
Select the screen you want to work on
-
Edit your Lua script or SVG template — changes appear automatically
-
Use the calibration tools to tune dithering for your panel
-
Check the console below the preview if something goes wrong
Differences from Production
Dev mode includes a few differences from the production byonk serve command:
- Additional
/dev/*routes for the simulator UI - File watching enabled (when using external SCREENS_DIR)
- No content caching — always renders fresh content
- More verbose logging by default
- Tuning and color overrides are session-only (reset on server restart)